Exploiting the iPhone 4, Part 6: Post-boot Paradise
Reading time: 15 minutes
gala
This series follows along as I build gala, an iOS 4 jailbreak for the iPhone 4.
- Part 1: Gaining Entry
- Part 2: Bypassing the Boot Chain
- Part 3: Patching the Boot Chain
- Part 4: Investigating the Ramdisk
- Part 5: Flashing the Filesystem
- Part 6: Post-boot Paradise
|
|
|
|---|
On with the show...
Table of contents
Installing Cydia
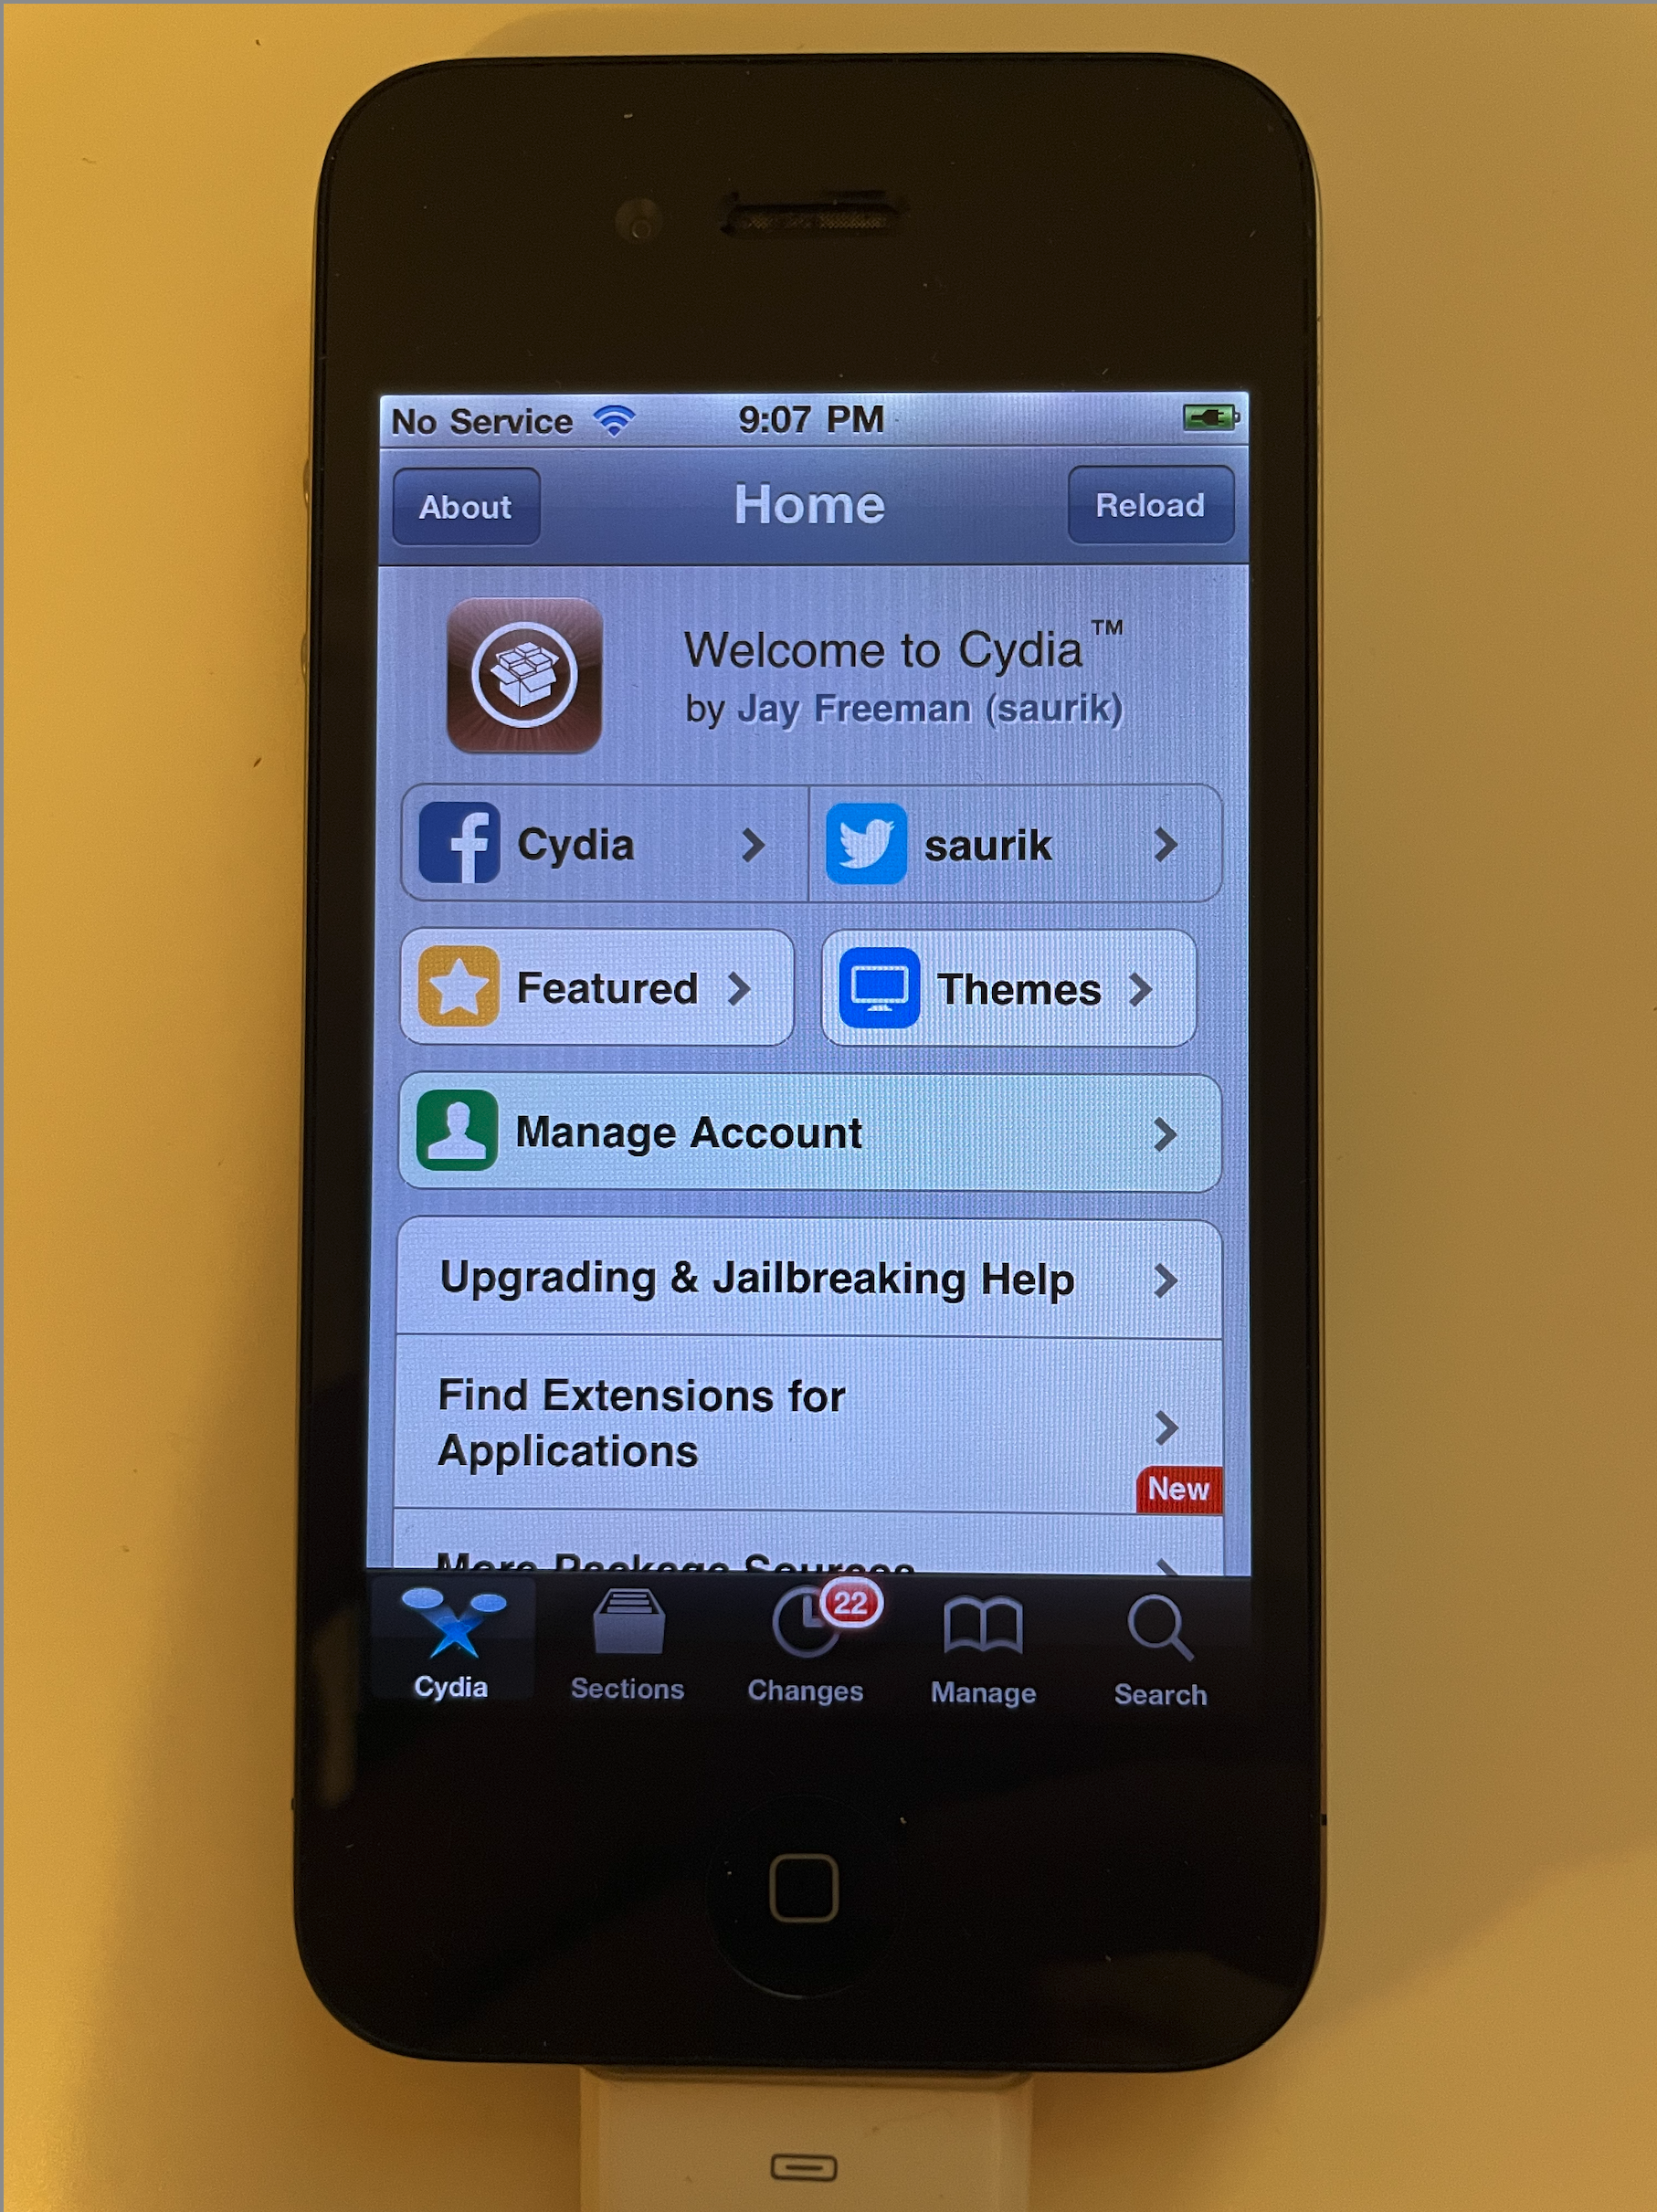
We’ve managed to flash and boot a modified iOS distribution! We’re now in the home-stretch of a user-facing jailbreak.
The main thing that end-users typically expect from a jailbreak is that they can open up Cydia and install some runtime modifications that alter the behavior of system processes such as SpringBoard.
I wasn’t sure exactly how jailbreaks install Cydia, aside from a loose guess that the jailbreak ships a copy of Cydia.app and copies it to /Applications/. This is roughly right, but there’s more to the story.
Let’s crack open a jailbreak to see what it does. Here I’ve got an old build of redsn0w.
Cool! Just like we guessed, the jailbreak ships a payload containing Cydia.app. Let’s take a closer look at its contents.

Thanks saurik! This payload contains not just Cydia.app, but an entire sysroot that bootstraps our scrappy iPhone 4 into a legitimate development platform. Among other things, the Cydia bootstrap embeds:
- Many standard UNIX utilities that are missing from the stock iOS distribution, compiled for
armv6. - An
APTdistribution. - A
PAMdistribution. - A
dpkgdistribution. - A
/usr/includefleshed out with development headers for several modules installed by the bootstrap.
We can apply the Cydia.tar bootstrap to the root filesystem in the same way that we installed our dropbear distribution✱:
✱ Note
Cydia.tar in the gala repo, as I wasn’t sure what its license was, or where the ‘official’ distribution channel lived. He confirmed that this was all kosher (thanks!).iPhone3_1_4_0_8A293_patches/root_filesystem.py
    root_filesystem_patches = DmgPatchSet(
        # ...
        DmgApplyTarPatch(tar_path=ASSETS_ROOT / "Cydia.tar"),
        # ...
    )
Just like that, Cydia is installed!
The Cydia.tar also embeds uname:
iPhone:~ root# uname -a
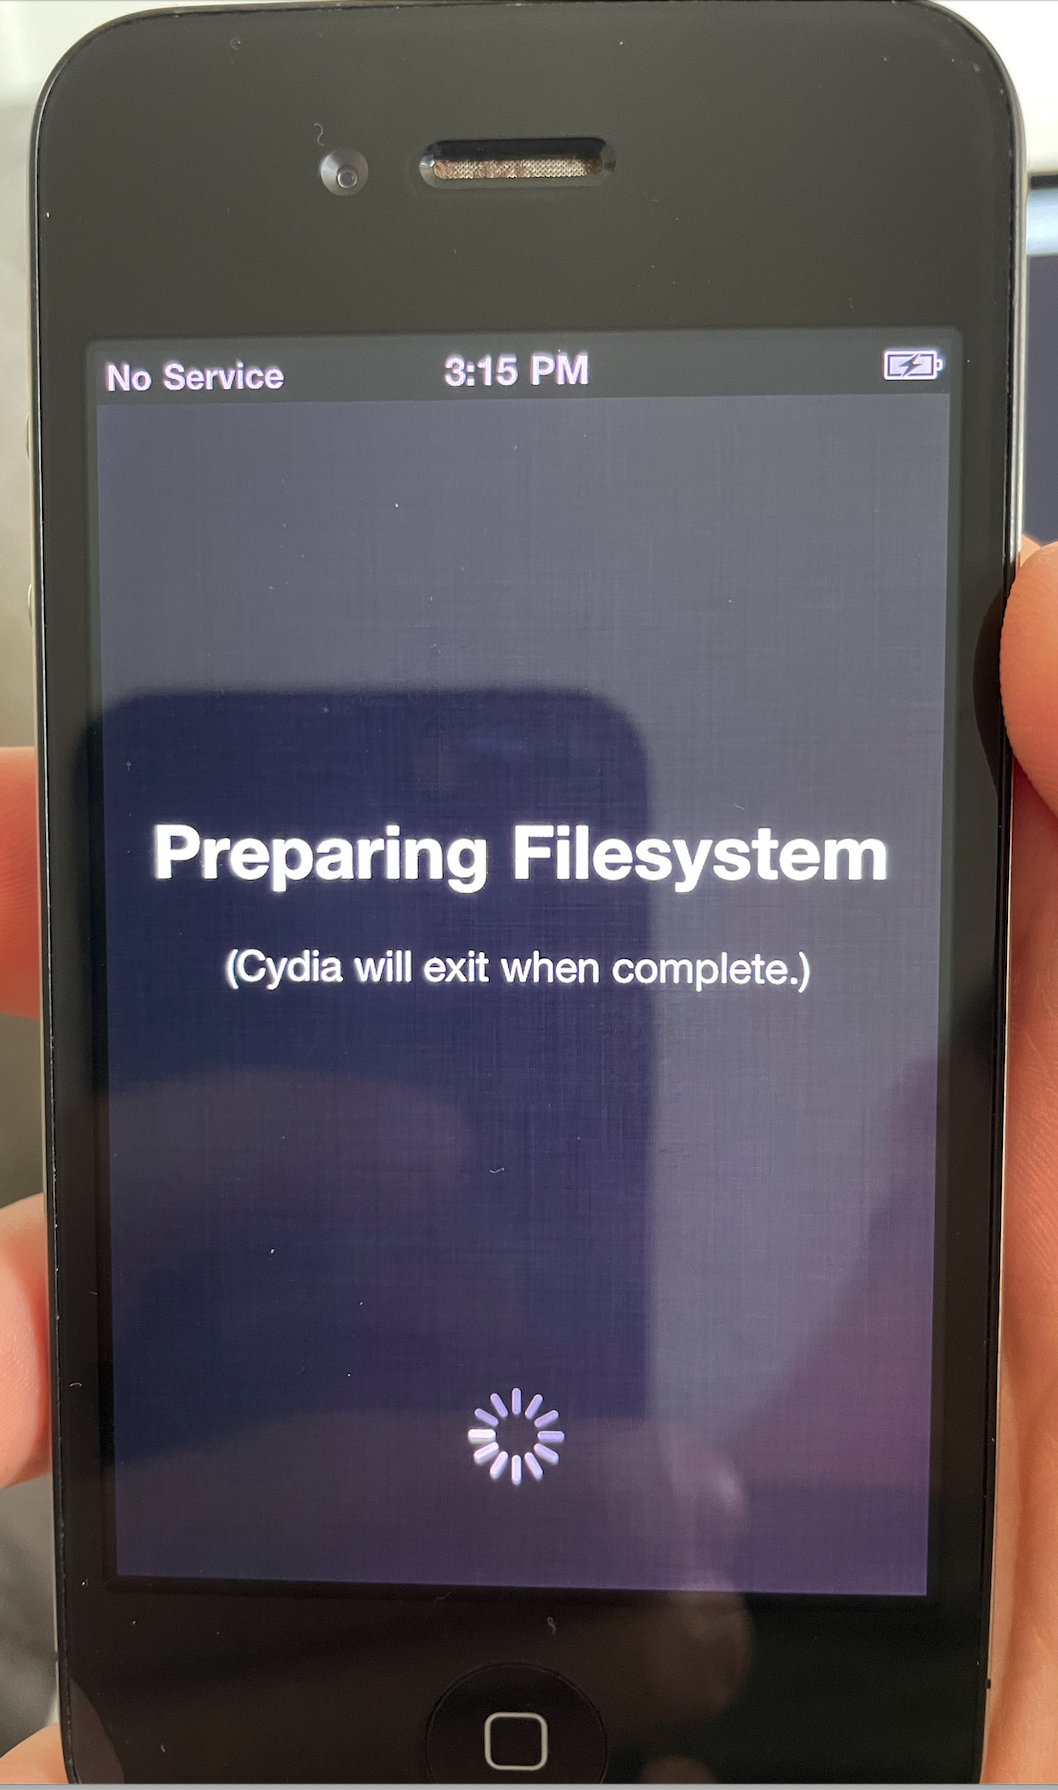
Darwin iPhone 10.3.1 Darwin Kernel Version 10.3.1: Wed May 26 22:28:33 PDT 2010; root:xnu-1504.50.73~2/RELEASE_ARM_S5L8930X iPhone3,1 arm N90AP DarwinUnfortunately, when we try to launch Cydia, it crashes immediately.
Bypassing the sandbox
Cydia does include a bit of output that helps to track down what’s going wrong.
2023-08-13 14:32:03.850 MobileCydia[172:613] Setting Language: en_US
_assert(13:file != NULL)@Sources.mm:51[CydiaWriteSources]
Cydia is open source, but it’s unclear exactly what revision is shipped in this bootstrap. In any case, a quick check in a disassembler reveals that Cydia is trying, and failing, to access /etc/apt/sources.list.d/saurik.list.
This is failing because Cydia is restricted by the app sandbox, which prohibits the accessible directories. We’ll need our hacked-up kernel to skip this enforcement, so that Cydia can access everything it needs.
Firstly, let’s make a small test to keep track of our sandbox restrictions.
sandbox_test.rs
fn main() -> () {
    let paths = [
        "/var/mobile/foo",
        "/etc/test",
    ].map(|p| CString::new(p).unwrap());
    let file_access_mode = CString::new("r").unwrap();
    loop {
        for path in paths.iter() {
            println!("Poking {path}...");
            let file_ptr = libc::fopen(
                path.as_ptr() as *const c_char,
                file_access_mode.as_ptr() as *const c_char,
            );
            if file_ptr.is_null() {
                println!("\tInaccessible");
            }
            else {
                println!("\tAccessible");
            }
            // Just a quick test, no one will mind a dangling file handle here or there...
        }
        // Wait a bit to allow myself to tweak something or other
        libc::sleep(5);
    }
}
When we run this, we can observe that the entire filesystem is accessible to the root user, whereas it’s restricted for the mobile user.
$ su - root /var/sandbox_test
Poking /var/mobile/foo...
    Accessible
Poking /etc/test...
    Accessible
^C
$ su - mobile /var/sandbox_test
Poking /var/mobile/foo...
    Accessible
Poking /etc/test...
    Inaccessible
^C
The iOS sandbox is an abstraction built on top of the TrustedBSD Mandatory Access Control framework✱, and it’s a lot easier to say that than to find where within the compiled kernel it’s configured.
✱ Note
The MAC framework operates as a large set of optional callbacks that can be invoked when user code asks the kernel to perform one action or another: open this file, map that memory, etc. It’s a bit similar to eBPF with all the user-configurable callback hooks that are now littered throughout the kernel, but in this case the ‘user-configurable callback code’ is always other Apple-owned kernel extensions, such as Sandbox.kext, rather than userspace-bound untrusted clients.
Breaking out of the sandbox is the toughest stage of jailbreaking.
Of course, a boot ROM exploit gives us a pretty massive leg up.
Tracking down where the sandbox and AMFI configure their MAC policies was arduous, though. Eventually, I turned to one of the open-source XNU releases from around the time this kernel was built, to see what the MAC implementation looks like in the source.
A huge list of function pointers that are used as callbacks…
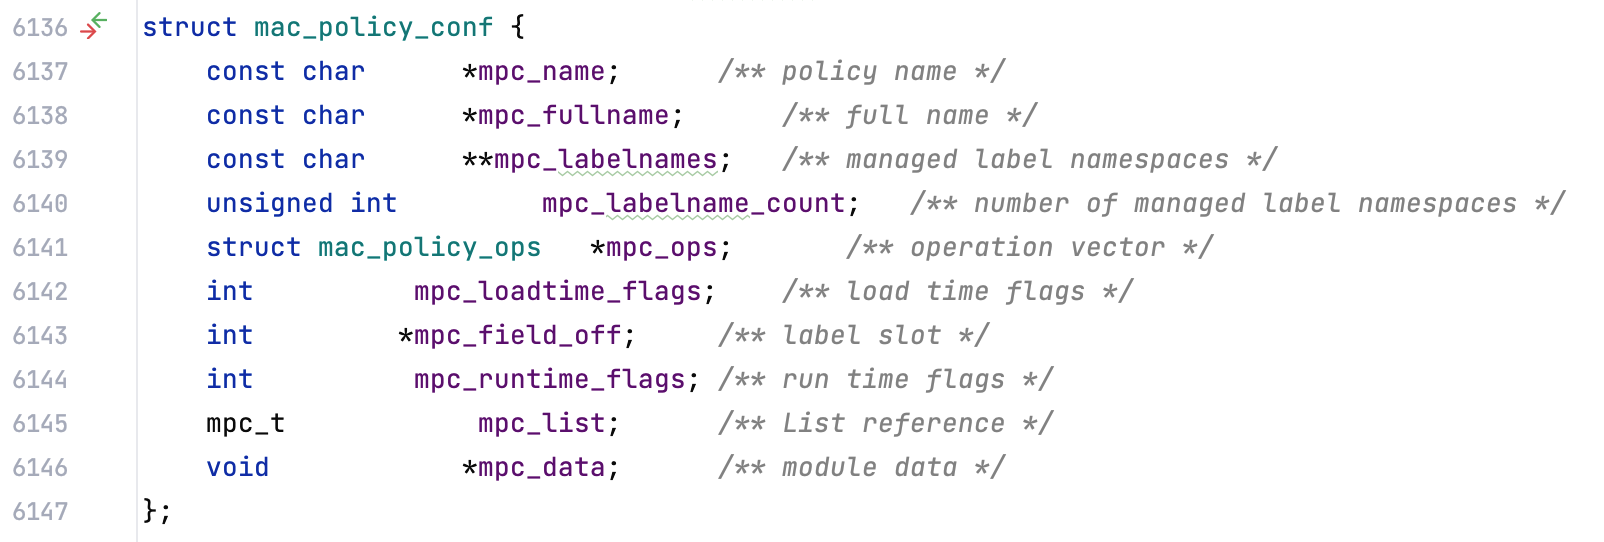
… a structure describing the KEXT’s MAC configuration, from its name to its callback pointers…
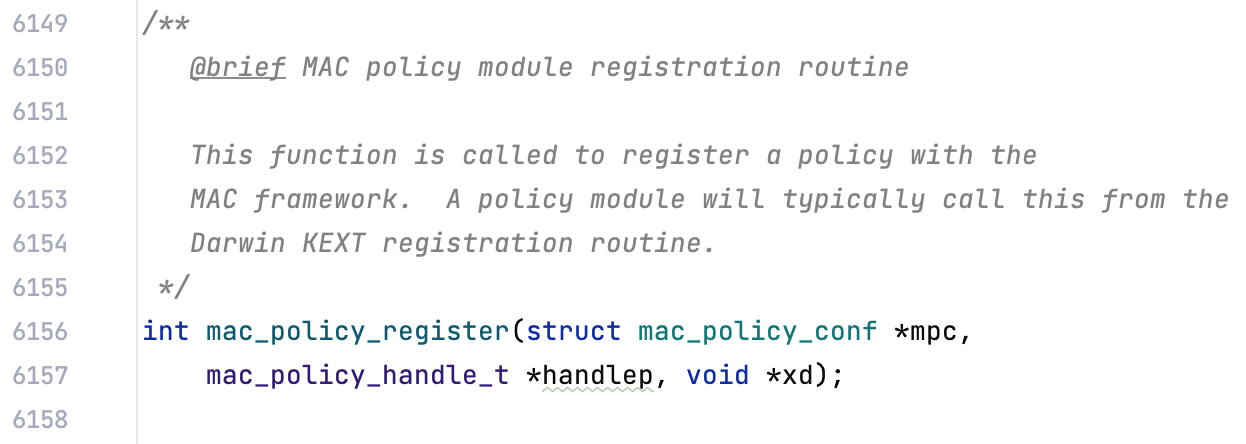
… and lastly, the function that each KEXT will call to register its MAC policy.
This clears things up! Sandbox.kext will call mac_policy_register(), and will pass it some static data specifying all of its callback pointers.
It’s still a hassle to track down where this all happens within the compiled kernel, but we get there eventually.
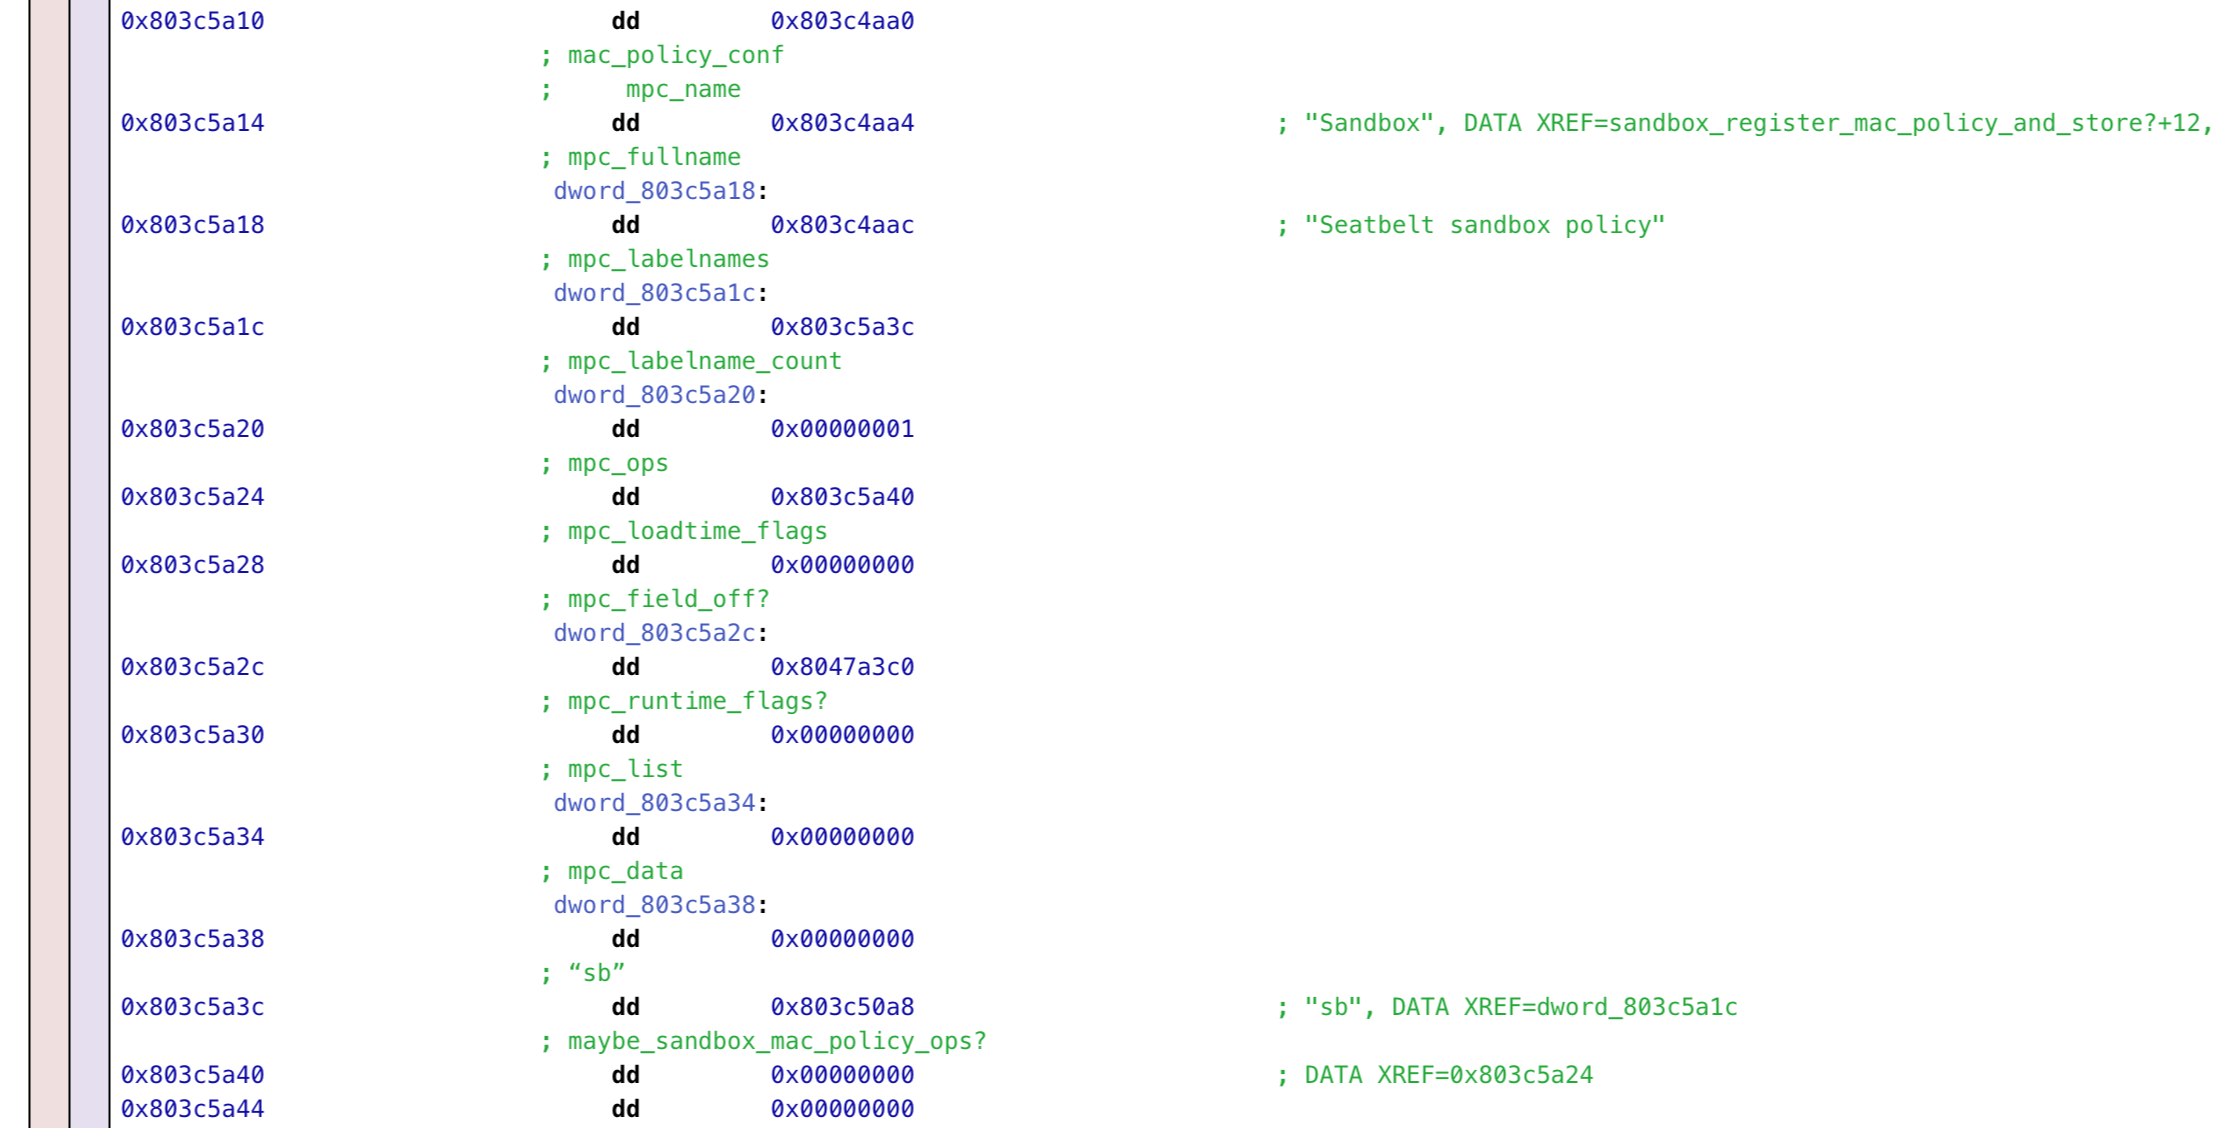
I settled on overwriting all the MAC callback pointers in Sandbox.kext’s MAC configuration with zeroes. The callbacks will never be invoked, and will never get the chance to apply sandboxing rules.
iPhone3_1_4_0_8A293_patches/kernelcache.py
    sandbox_callbacks_start = 0x803C5A40
    sandbox_callbacks_end = 0x803C5F20
    zero_fill = b"\0" * (sandbox_callbacks_end - sandbox_callbacks_start)
    sandbox_blob_patch = BlobPatch(
        address=VirtualMemoryPointer(sandbox_callbacks_start),
        new_content=zero_fill
    )
Let’s give it a try…
$ su - root /var/sandbox_test
Poking /var/mobile/foo...
    Accessible
Poking /etc/test...
    Accessible
^C
$ su - mobile /var/sandbox_test
Poking /var/mobile/foo...
    Accessible
Poking /etc/test...
    Accessible
^C
Great! The sandbox is broken, and mobile can now access the full filesystem.
Patching a live system
Every time I want to try a different kernel patch, I currently need to do a full iOS restore flow so the new kernelcache gets written to NOR. When investigating the sandbox, this feedback loop is unmanageably slow. What would be really nice is if we could patch the kernel while it’s running.
There are basically two approaches that are useful for this. Either would be enough on its own, but they’re both independently useful so we’ll throw them both into the jailbreak.
Firstly, in debug builds of iOS, the kernel provides /dev/mem and /dev/kmem device files. Accessing these files allows you to read and write to raw physical memory or the kernel’s address space, respectively.
Luckily, the code for these device files is still around in production builds, and it’s a simple matter of putting on our best puppy-dog eyes to get the system to enable them for us.
iPhone3_1_4_0_8A293_patches/kernelcache.py
    enable_dev_kmem = PatchSet(
        name="Enable /dev/kmem",
        patches=[
            InstructionPatch(
                address=VirtualMemoryPointer(0x8009F7AC),
                function_name="make_dev_nodes",
                reason="""
                    This code checks a flag in static data to determine
                    whether to create the /dev/mem and /dev/kmem files.
                    Instead of loading the flag from static data, override it,
                    so it's always set.
                """,
                orig_instructions=[Instr.thumb("ldr r3, [r3]")],
                patched_instructions=[Instr.thumb("movs r3, #1")],
            ),
            InstructionPatch(
                address=VirtualMemoryPointer(0x8009F7AC),
                function_name="make_dev_nodes",
                reason="""
                    This constant represents the permission bits on the /dev/mem
                    and /dev/kmem files.
                    Originally, this constant is 0o640.
                    Overwrite it to 0o666 instead.
                """,
                orig_instructions=["mov.w r4, #0x1a0"],
                patched_instructions=["mov.w r4, #0x1b6"],
            ),
        ],
    )
With that, we have unfettered access to kernel memory!
$ /var/kmem_test
CE FA ED FE 0C 00 00 00  09 00 00 00 02 00 00 00  |  ................
0C 00 00 00 54 08 00 00  01 00 00 00 01 00 00 00  |  ....T...........
D0 01 00 00 5F 5F 54 45  58 54 00 00 00 00 00 00  |  ....__TEXT......
00 00 00 00 00 10 00 80  00 30 24 00 00 00 00 00  |  .........0$.....
00 30 24 00 05 00 00 00  05 00 00 00 06 00 00 00  |  .0$.............
00 00 00 00 5F 5F 74 65  78 74 00 00 00 00 00 00  |  ....__text......
00 00 00 00 5F 5F 54 45  58 54 00 00 00 00 00 00  |  ....__TEXT......
00 00 00 00 00 20 00 80  44 0B 1E 00 00 10 00 00  |  ..... ..D.......
0C 00 00 00 00 00 00 00  00 00 00 00 00 04 00 80  |  ................
00 00 00 00 00 00 00 00  5F 5F 63 73 74 72 69 6E  |  ........__cstrin
67 00 00 00 00 00 00 00  5F 5F 54 45 58 54 00 00  |  g.......__TEXT..
00 00 00 00 00 00 00 00  44 2B 1E 80 07 78 03 00  |  ........D+...x..
44 1B 1E 00 02 00 00 00  00 00 00 00 00 00 00 00  |  D...............
02 00 00 00 00 00 00 00  00 00 00 00 5F 5F 63 6F  |  ............__co
6E 73 74 00 00 00 00 00  00 00 00 00 5F 5F 54 45  |  nst.........__TE
58 54 00 00 00 00 00 00  00 00 00 00 4C A3 21 80  |  XT..........L.!.
E0 4E 02 00 4C 93 21 00  02 00 00 00 00 00 00 00  |  .N..L.!.........
00 00 00 00 00 00 00 00  00 00 00 00 00 00 00 00  |  ................
69 6E 69 74 63 6F 64 65  00 00 00 00 00 00 00 00  |  initcode........
5F 5F 54 45 58 54 00 00  00 00 00 00 00 00 00 00  |  __TEXT..........
Secondly, we’ll also want to grant the ability to call task_for_pid(0). task_for_pid() yields a task port, which allows full control over the execution and address space of another process. PID 0 represents the kernel task, and XNU has a special check to ensure no one can control it:
xnu/bsd/vm/vm_unix.c
/*
*	Routine:	task_for_pid
*	Purpose:
*		Get the task port for another "process", named by its process ID.
*		Only permitted to privileged processes, or processes with the same user ID.
*		Note: if pid == 0, an error is return no matter who is calling.
  */
  kern_return_t
  task_for_pid(
  struct task_for_pid_args *args)
  {
     /* Always check if pid == 0 */
     if (pid == 0) {
         (void ) copyout((char *)&t1, task_addr, sizeof(mach_port_name_t));
         AUDIT_MACH_SYSCALL_EXIT(KERN_FAILURE);
         return(KERN_FAILURE);
     }
We’ll just tidy that right up.
iPhone3_1_4_0_8A293_patches/kernelcache.py
    enable_task_for_pid_0 = PatchSet(
        name="Enable task_for_pid(0)",
        patches=[
            InstructionPatch(
                address=VirtualMemoryPointer(0x8017E552),
                function_name="task_for_pid",
                reason="""
                    This is an early-return to prevent task_for_pid()
                    returning a real answer for PID 0.
                    This code stays on a failure path if the provided PID is 0.
                    We always want to branch away to the success path,
                    which proceeds with the task_for_pid() call.
                """,
                orig_instructions=[Instr.thumb("cbnz r4, #0x8017e56c")],
                patched_instructions=[Instr.thumb("b #0x8017e56c")],
            ),
        ],
    )
Elevating to root
When Cydia first launches, it’ll be spawned by the mobile user. Before it does much of anything, it’ll try to elevate its privileges via setuid(0). This won’t work on a stock system; if it did, arbitrary apps would be able to take root, which would be very bad.
Let’s write another quick test to verify our understanding that the system restricts setuid(0) out-of-the-box.
setuid_test.rs
fn main() -> () {
    let ret = libc::setuid(0);
    println!("setuid(0) returned %d");
}
Trying it out shows that setuid(0) is restricted.
$ /var/setuid_test
setuid(0) returned -1
Let’s patch suser in the kernel…
iPhone3_1_4_0_8A293_patches/kernelcache.py
setuid_patch = PatchSet(
    name="Everyone is root",
    patches=[
        InstructionPatch(
            address=VirtualMemoryPointer(0x8014C696),
            function_name="suser",
            reason="""
                Checks the return value of kauth_cred_getuid().
                If we're not UID 0, returns zero.
                Let's pretend we're always UID 0.
            """,
            orig_instructions=[Instr.thumb("cbnz r0, #0x8014c6a4")],
            patched_instructions=[Instr.thumb("movs r0, #0")],
        )
    ],
)
Our test program shows that setuid(0) is now unrestricted!
$ /var/setuid_test
setuid(0) returned 0
With all that✱ out of the way, let’s try launching Cydia again!
✱ Note
Awesome, no more crashes!
TLS troubleshooting
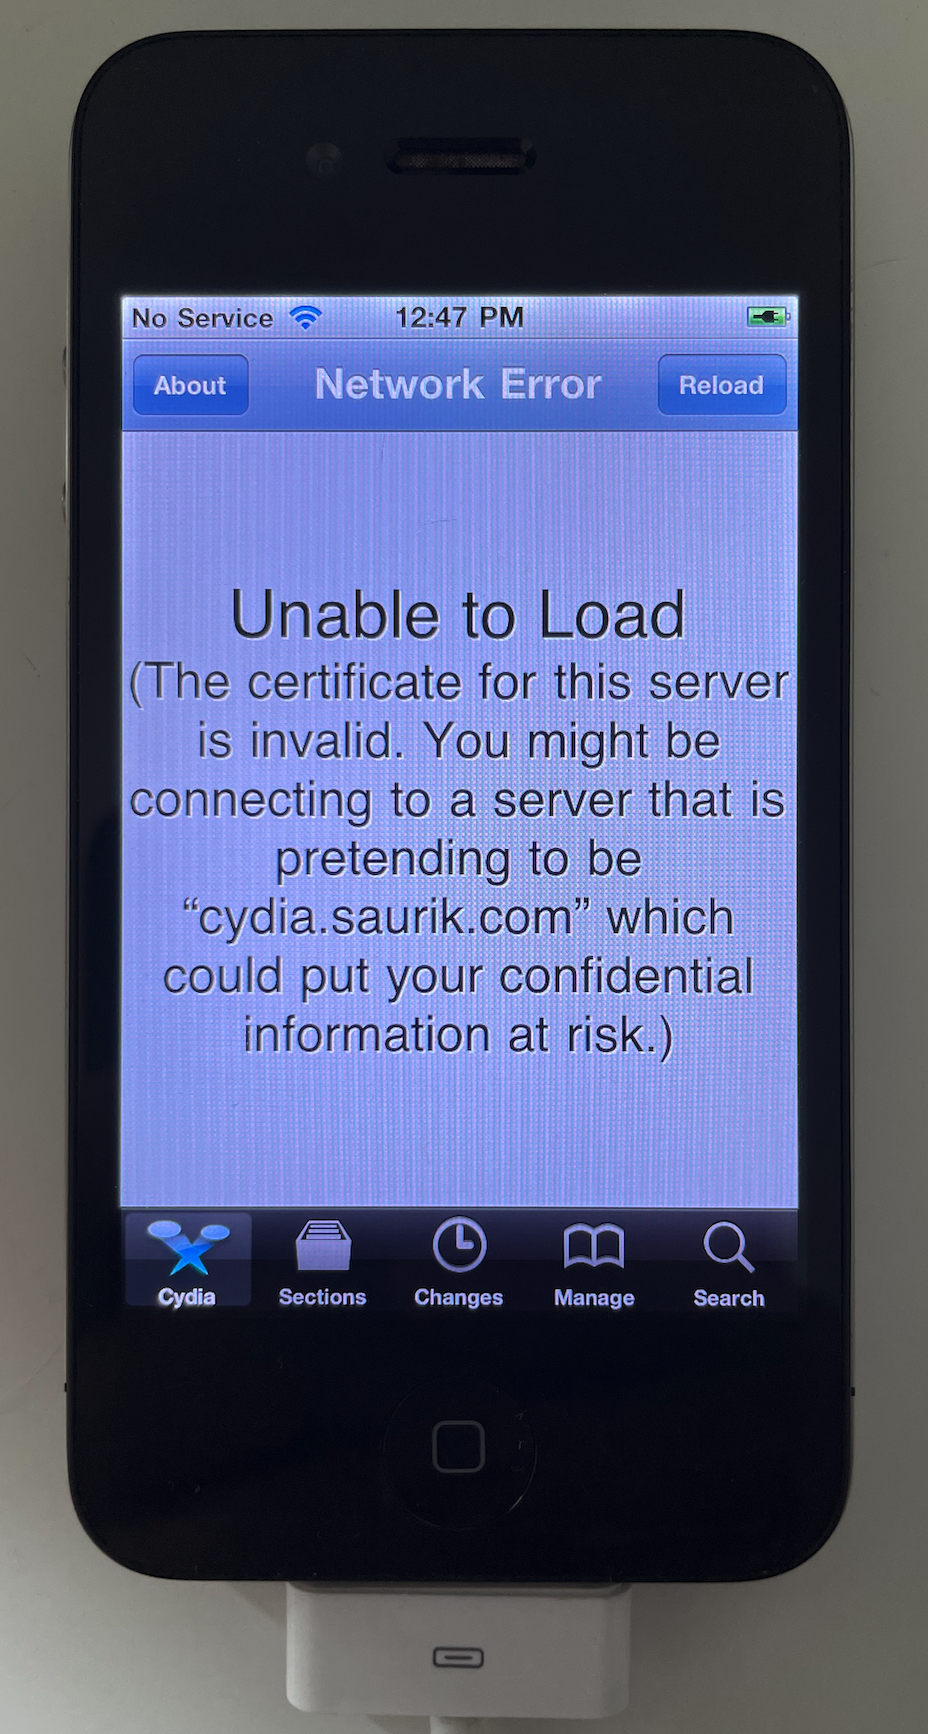
When Cydia launches, it queries a remote server and uses the data it receives to render the landing page. When we launch it, though, the landing page instead bubbles up a rejected SSL certificate.
My initial hypothesis was that something in the jailbreak was preventing SSL from working. Heady in the rush of hacking up iOS, I decided to disable SSL certificate validation globally in our iOS distribution.
The consequences of this were far-reaching, and precluded discovering whether Cydia successfully showed a sane landing page: depending on what exactly I patched, iOS either wouldn’t boot at all, or wouldn’t connect to my Mac to get past the iTunes ‘activation’ step✱.
✱ Note
Hacktivation), but I decided that if whatever I changed made it so that the device couldn’t connect to iTunes at all, it probably wasn’t something I wanted to devote more time to.Eventually, I played around a bit more with the freshly booted system, and realized that some sites were accessible in Safari! This made the real issue clear: iOS 4 ships with an outdated set of root SSL certificates, and the certificate chain used for cydia.saurik.com depends on a root certificate that’s not trusted by iOS 4’s root certificate store.
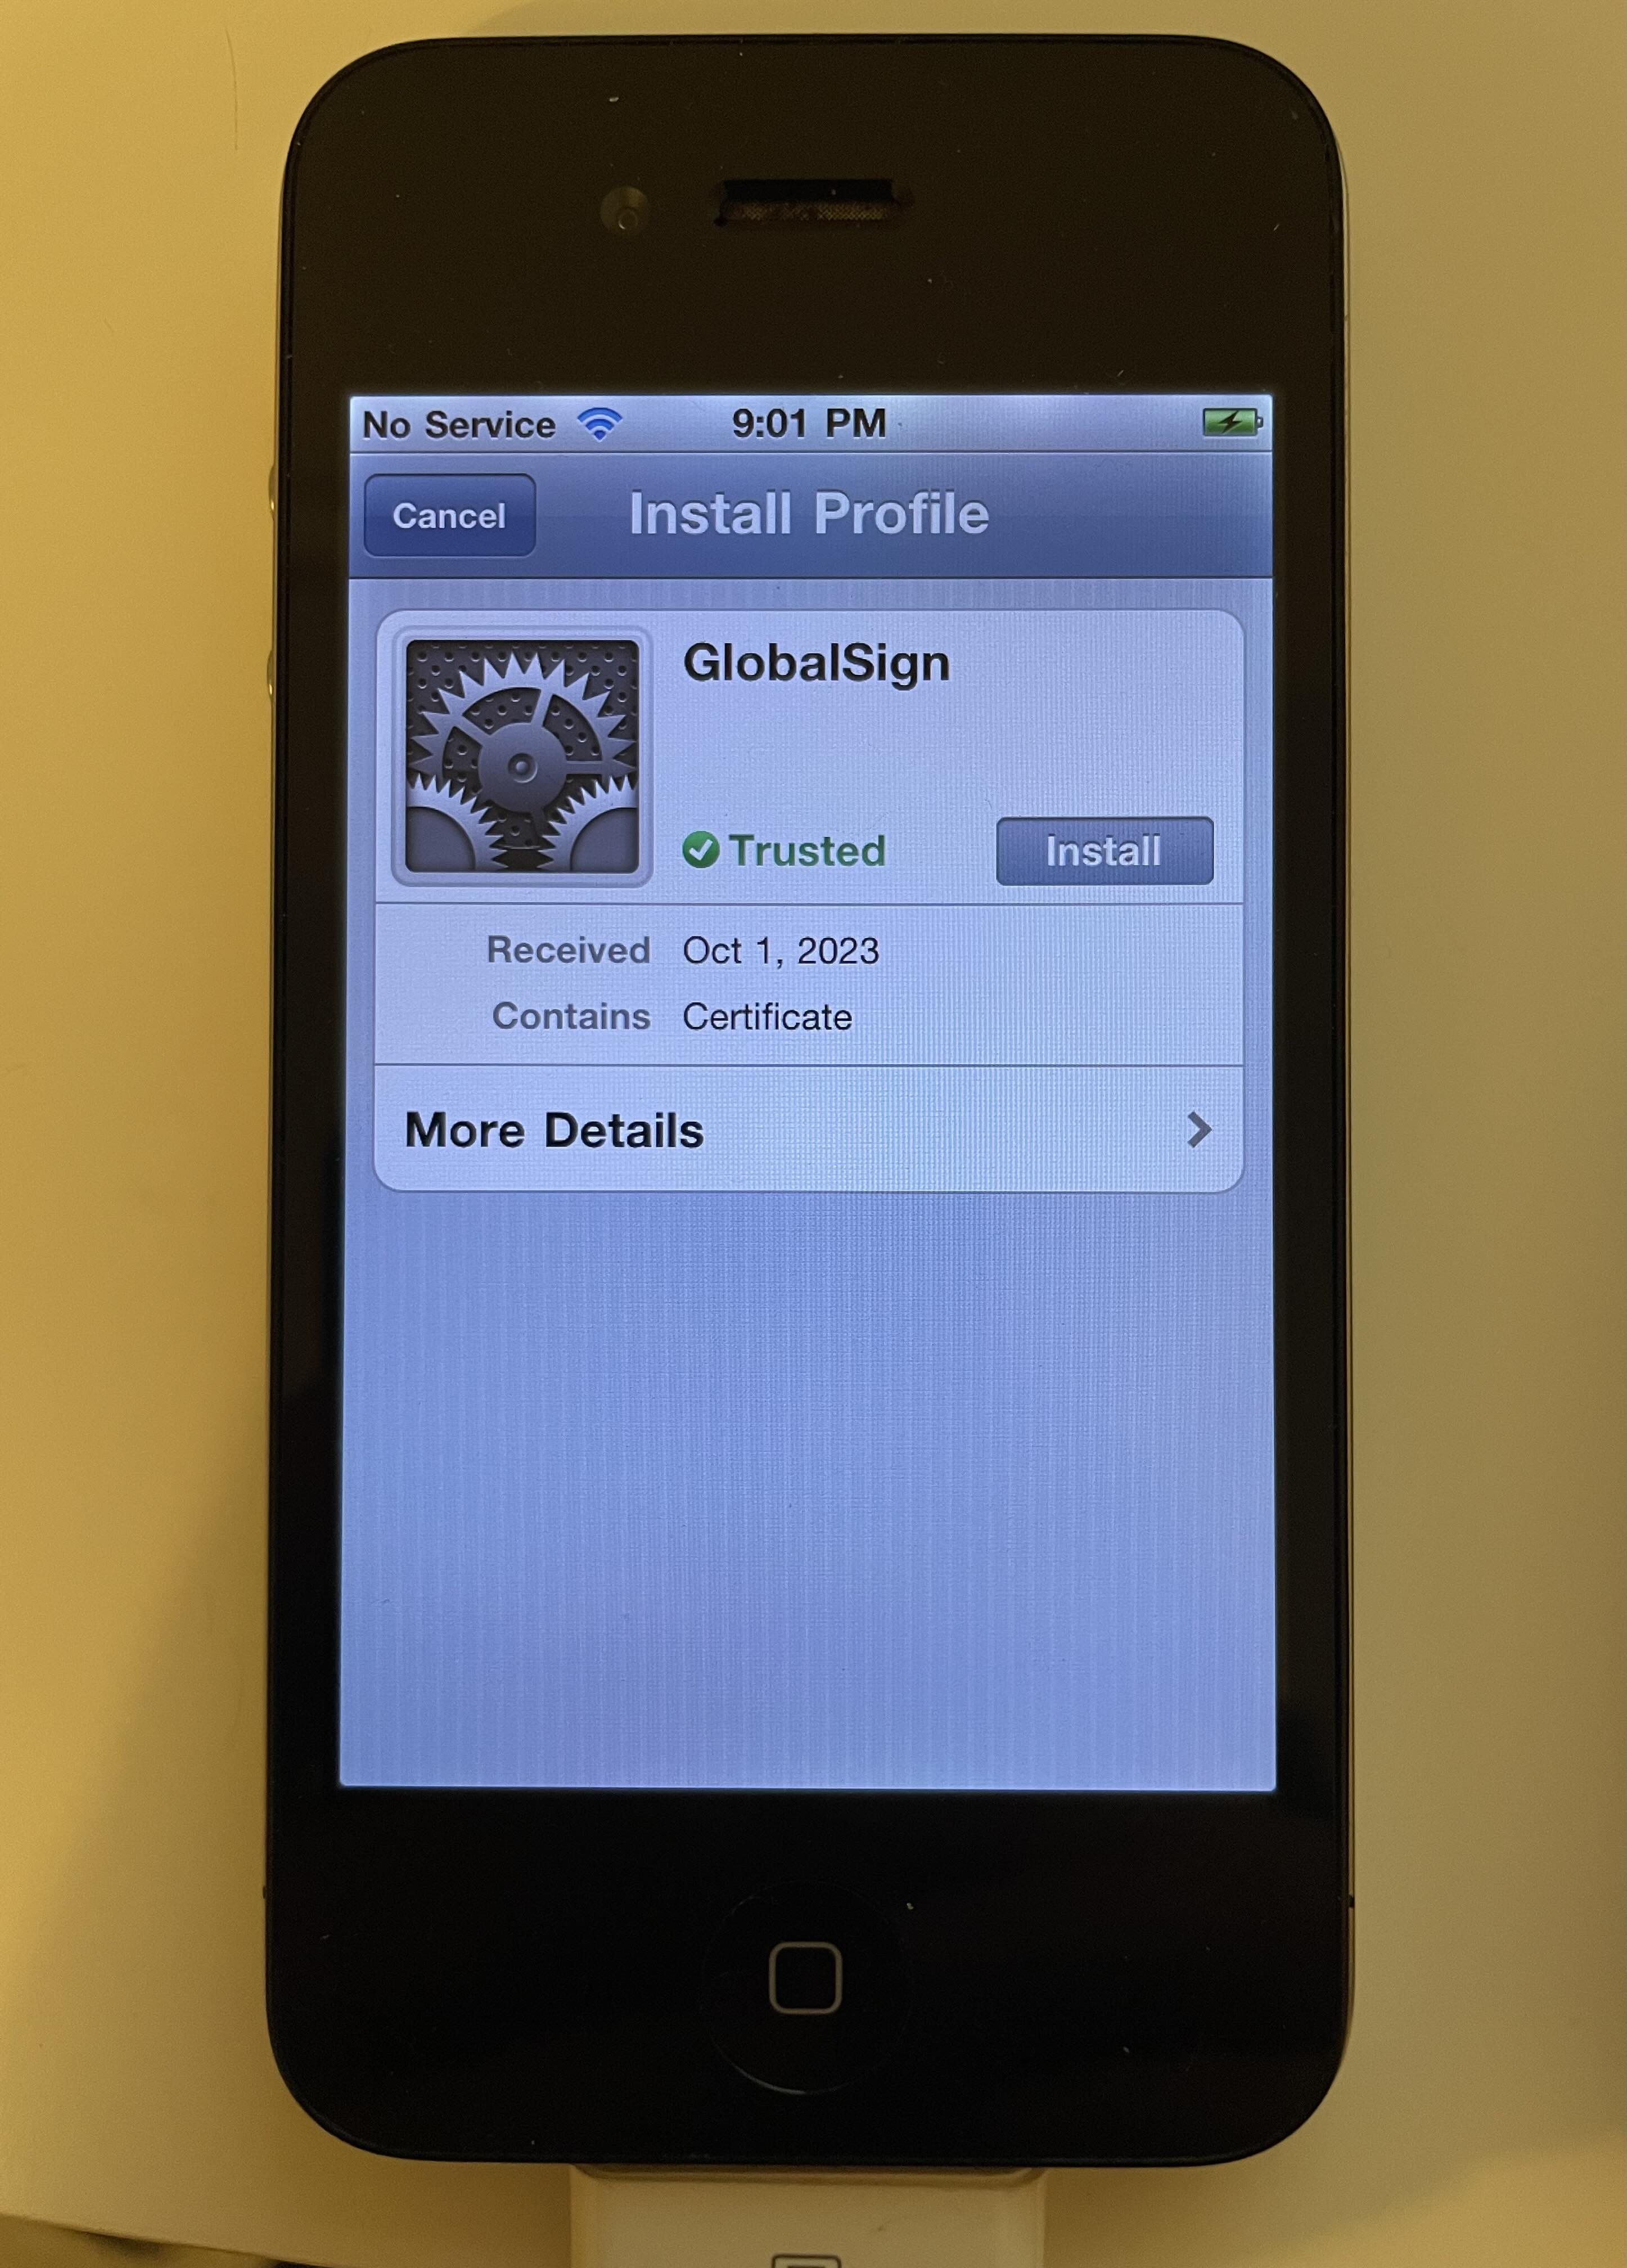
Let’s take a look at the certificate chain for cydia.saurik.com.
$ python3 print_cert_chain.py cydia.saurik.com
Connecting to "cydia.saurik.com" (174.35.118.62:443)...
Found certificate chain:
[0] GlobalSign Root CA - R3              (2009-03-18 to 2029-03-18)
    [1] GlobalSign RSA OV SSL CA 2018    (2018-11-21 to 2028-11-21)
        [2] ssl2.cdngc.net               (2023-05-16 to 2024-05-28)
Interestingly, the root certificate in question (GlobalSign Root CA - R3) was issued before iOS 4 was distributed, but didn’t make it into iOS 4’s root store. To interact with the Cydia servers, we’ll need to get iOS to trust this certificate one way or another:
- Find the root certificate store within the iOS distribution, and patch it to include the
GlobalSign Root CA - R3certificate. - Install the root certificate post-hoc, using iOS’s mechanism that allows the user to trust a new root.
The first approach is very much preferred, because it means that things will “just work” when the user finishes running the jailbreak. By contrast, the second approach requires user interaction to fish out a copy of the root certificate, and hand it to the system in such a way that it’ll prompt the user to trust it.
Installing a certificate to iOS’s root store
I don’t know much about PKI or TLS infrastructure, but I’ll work with what I’ve got.
This distribution of iOS ships a list of Extended Validation certificate authority OIDs at /System/Library/Frameworks/Security.framework/EVRoots.plist, along with the SHA1 fingerprints of the recognized root certificates for each CA OID.
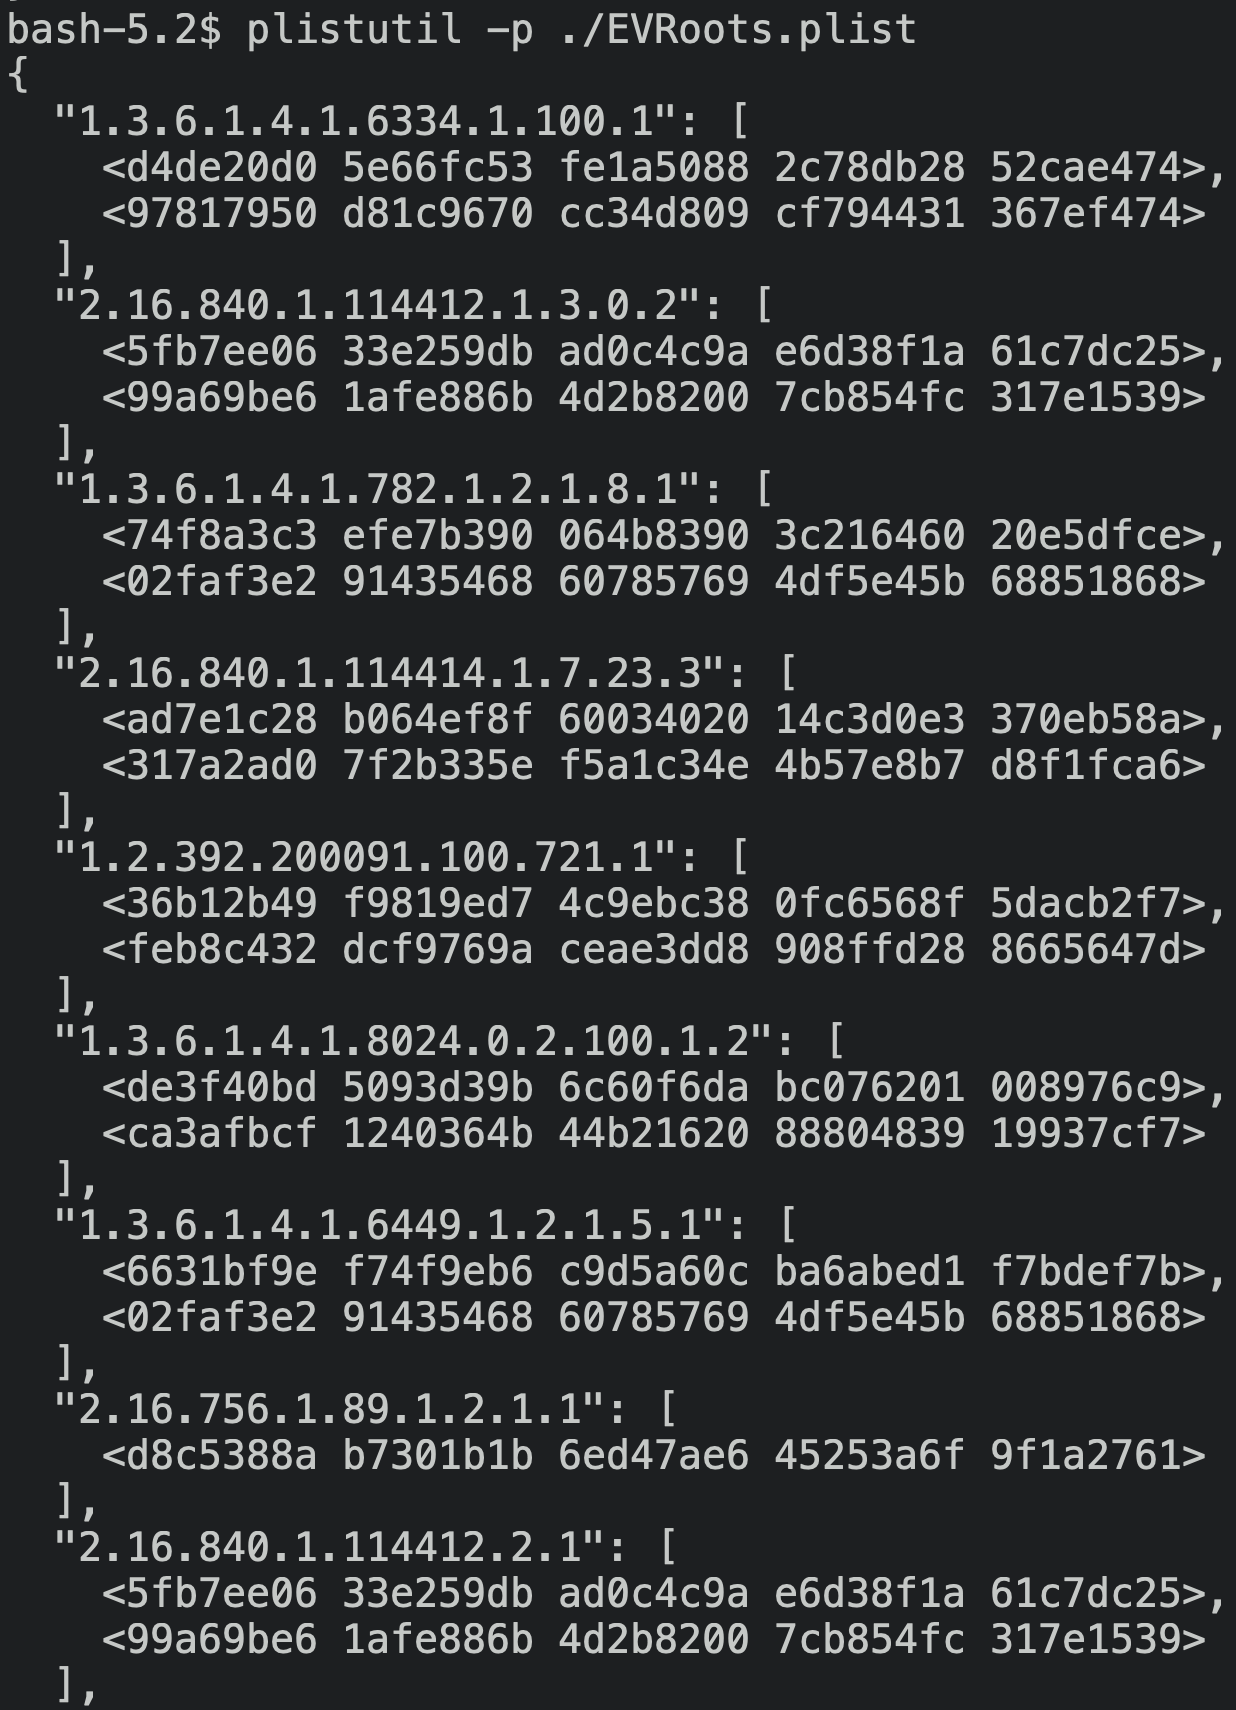
We can see that iOS 4 does trust the GlobalSign Root CA - R2 certificate, which was issued in 2006:
"1.3.6.1.4.1.4146.1.1": [
    <75e0abb6 13851227 1c04f85f ddde38e4 b7242efe>,
    <2f173f7d e99667af a57af80a a2d1b12f ac830338>
]
I went ahead and added the fingerprints for the R3 certificate to EVRoots.plist:
	<key>1.3.6.1.4.1.4146.1.1</key>
	<array>
		<data>1ptWEUjwHHfFRXjBCSbfW4Vpdq0=</data>
		<data>R2VVevQYxopkEZkUan5VaqgkKZY=</data>
		<data>C7+rlwWVlejR7EjonrhlfA5arnE=</data>
		<data>deCrthOFEiccBPhf3d445LckLv4=</data>
		<data>Lxc/femWZ6+levgKotGxL6yDAzg=</data>
	</array>
This should be on the right track, as /usr/libexec/securityd appears to load EVRoots.plist and compare it against inbound certificate chains. securityd contains SecPolicySubscriberCertificateCouldBeEV(), which calls SecDERItemCopyOIDDecimalRepresentation() and SecCertificateGetSHA1Digest(), comparing these values against the OIDs and fingerprints in EVRoots.plist.
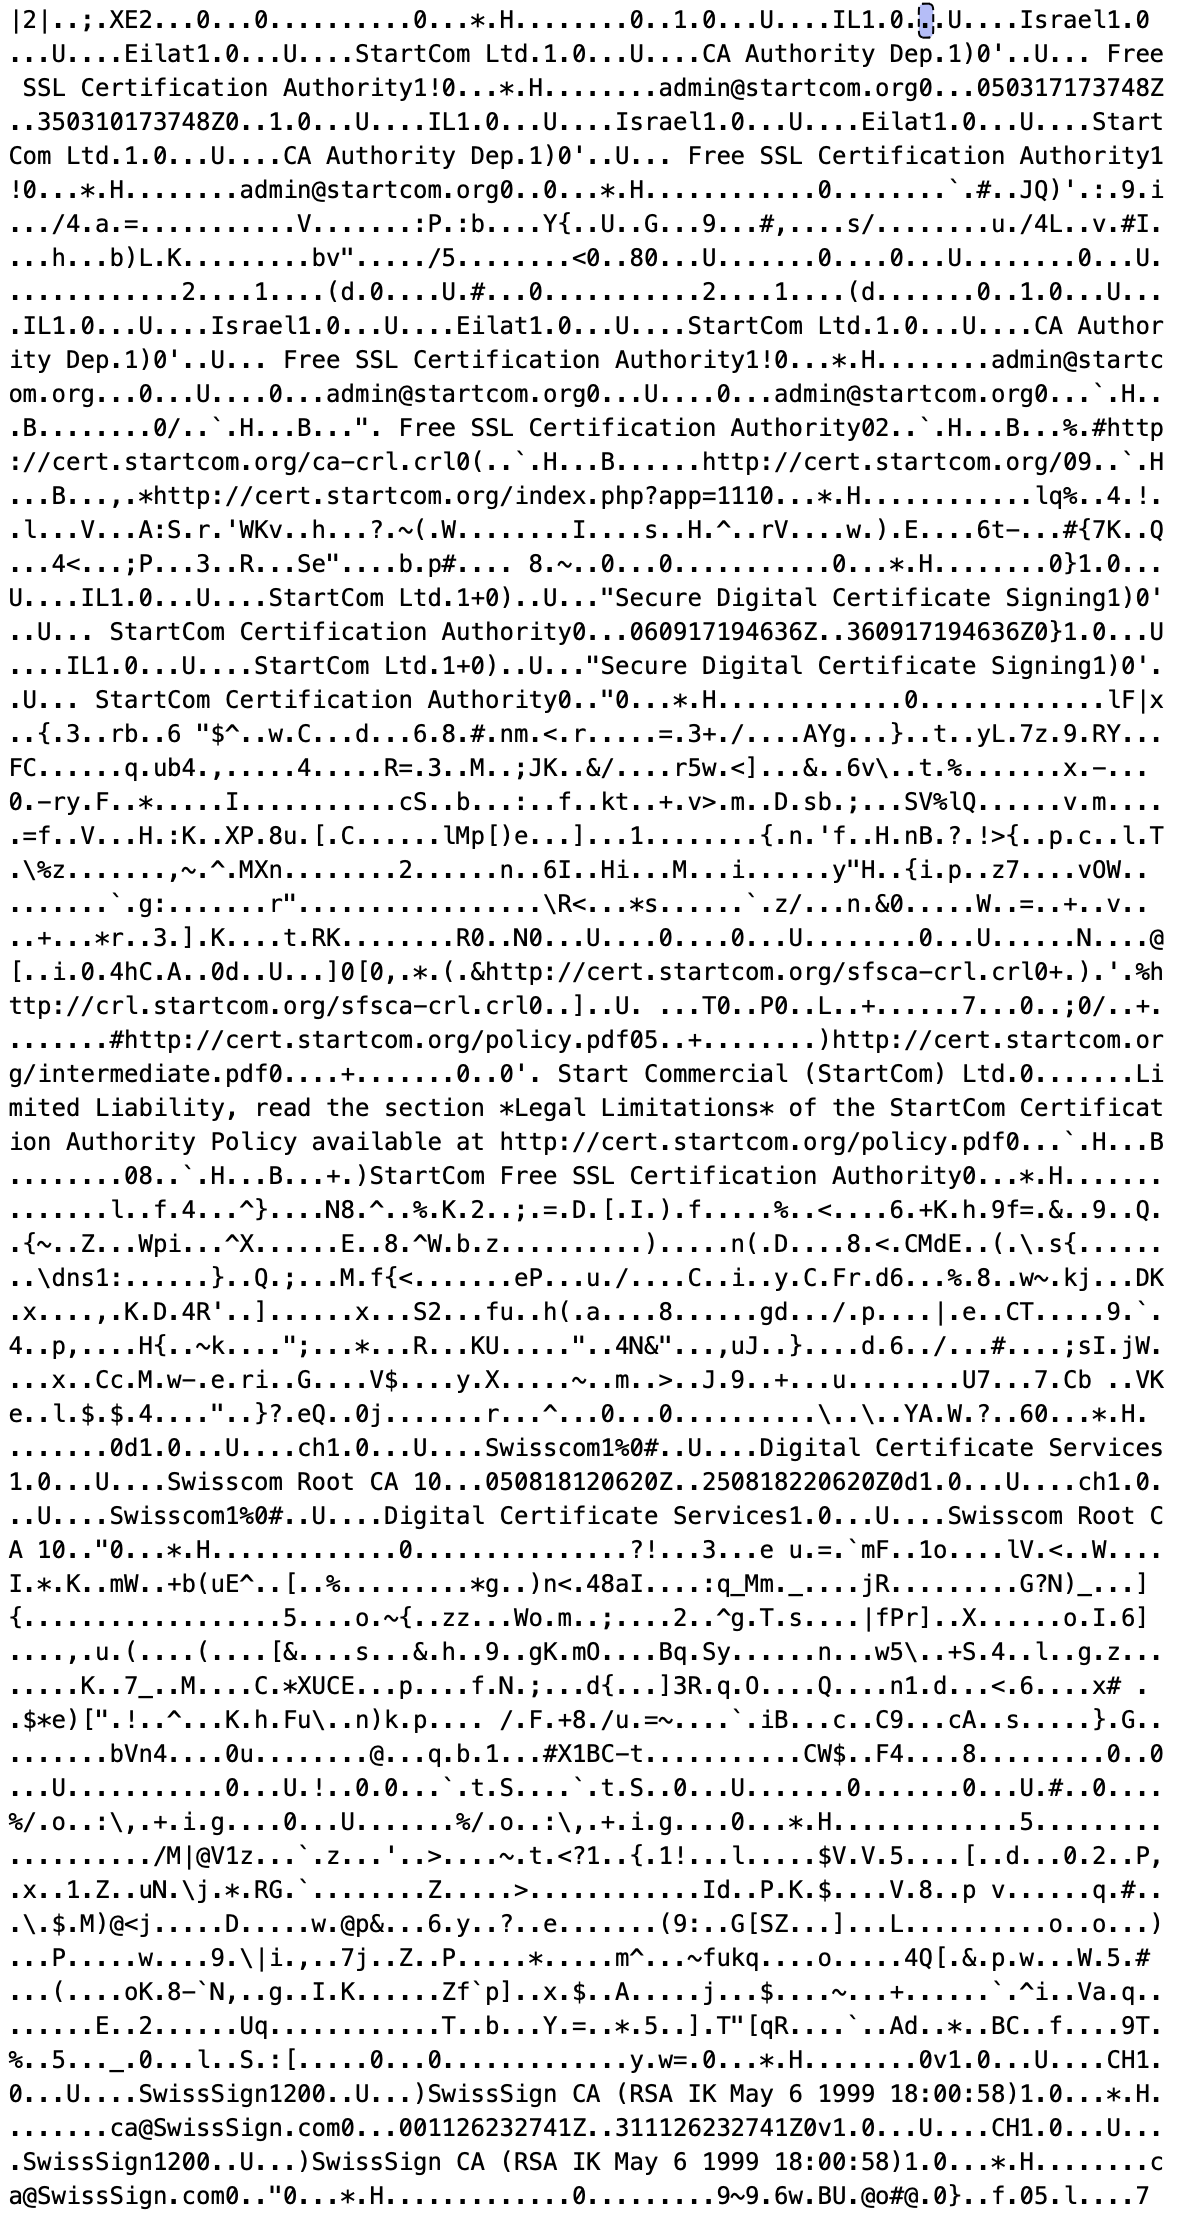
However, a SHA1 fingerprint and an OID do not a secure connection make✱. An OID matching GlobalSign’s could have been issued by a malicious certificate issuer, so iOS will also need to check the certificate’s public key against a source of truth. The trusted root keys are compiled directly into securityd:
✱ Note
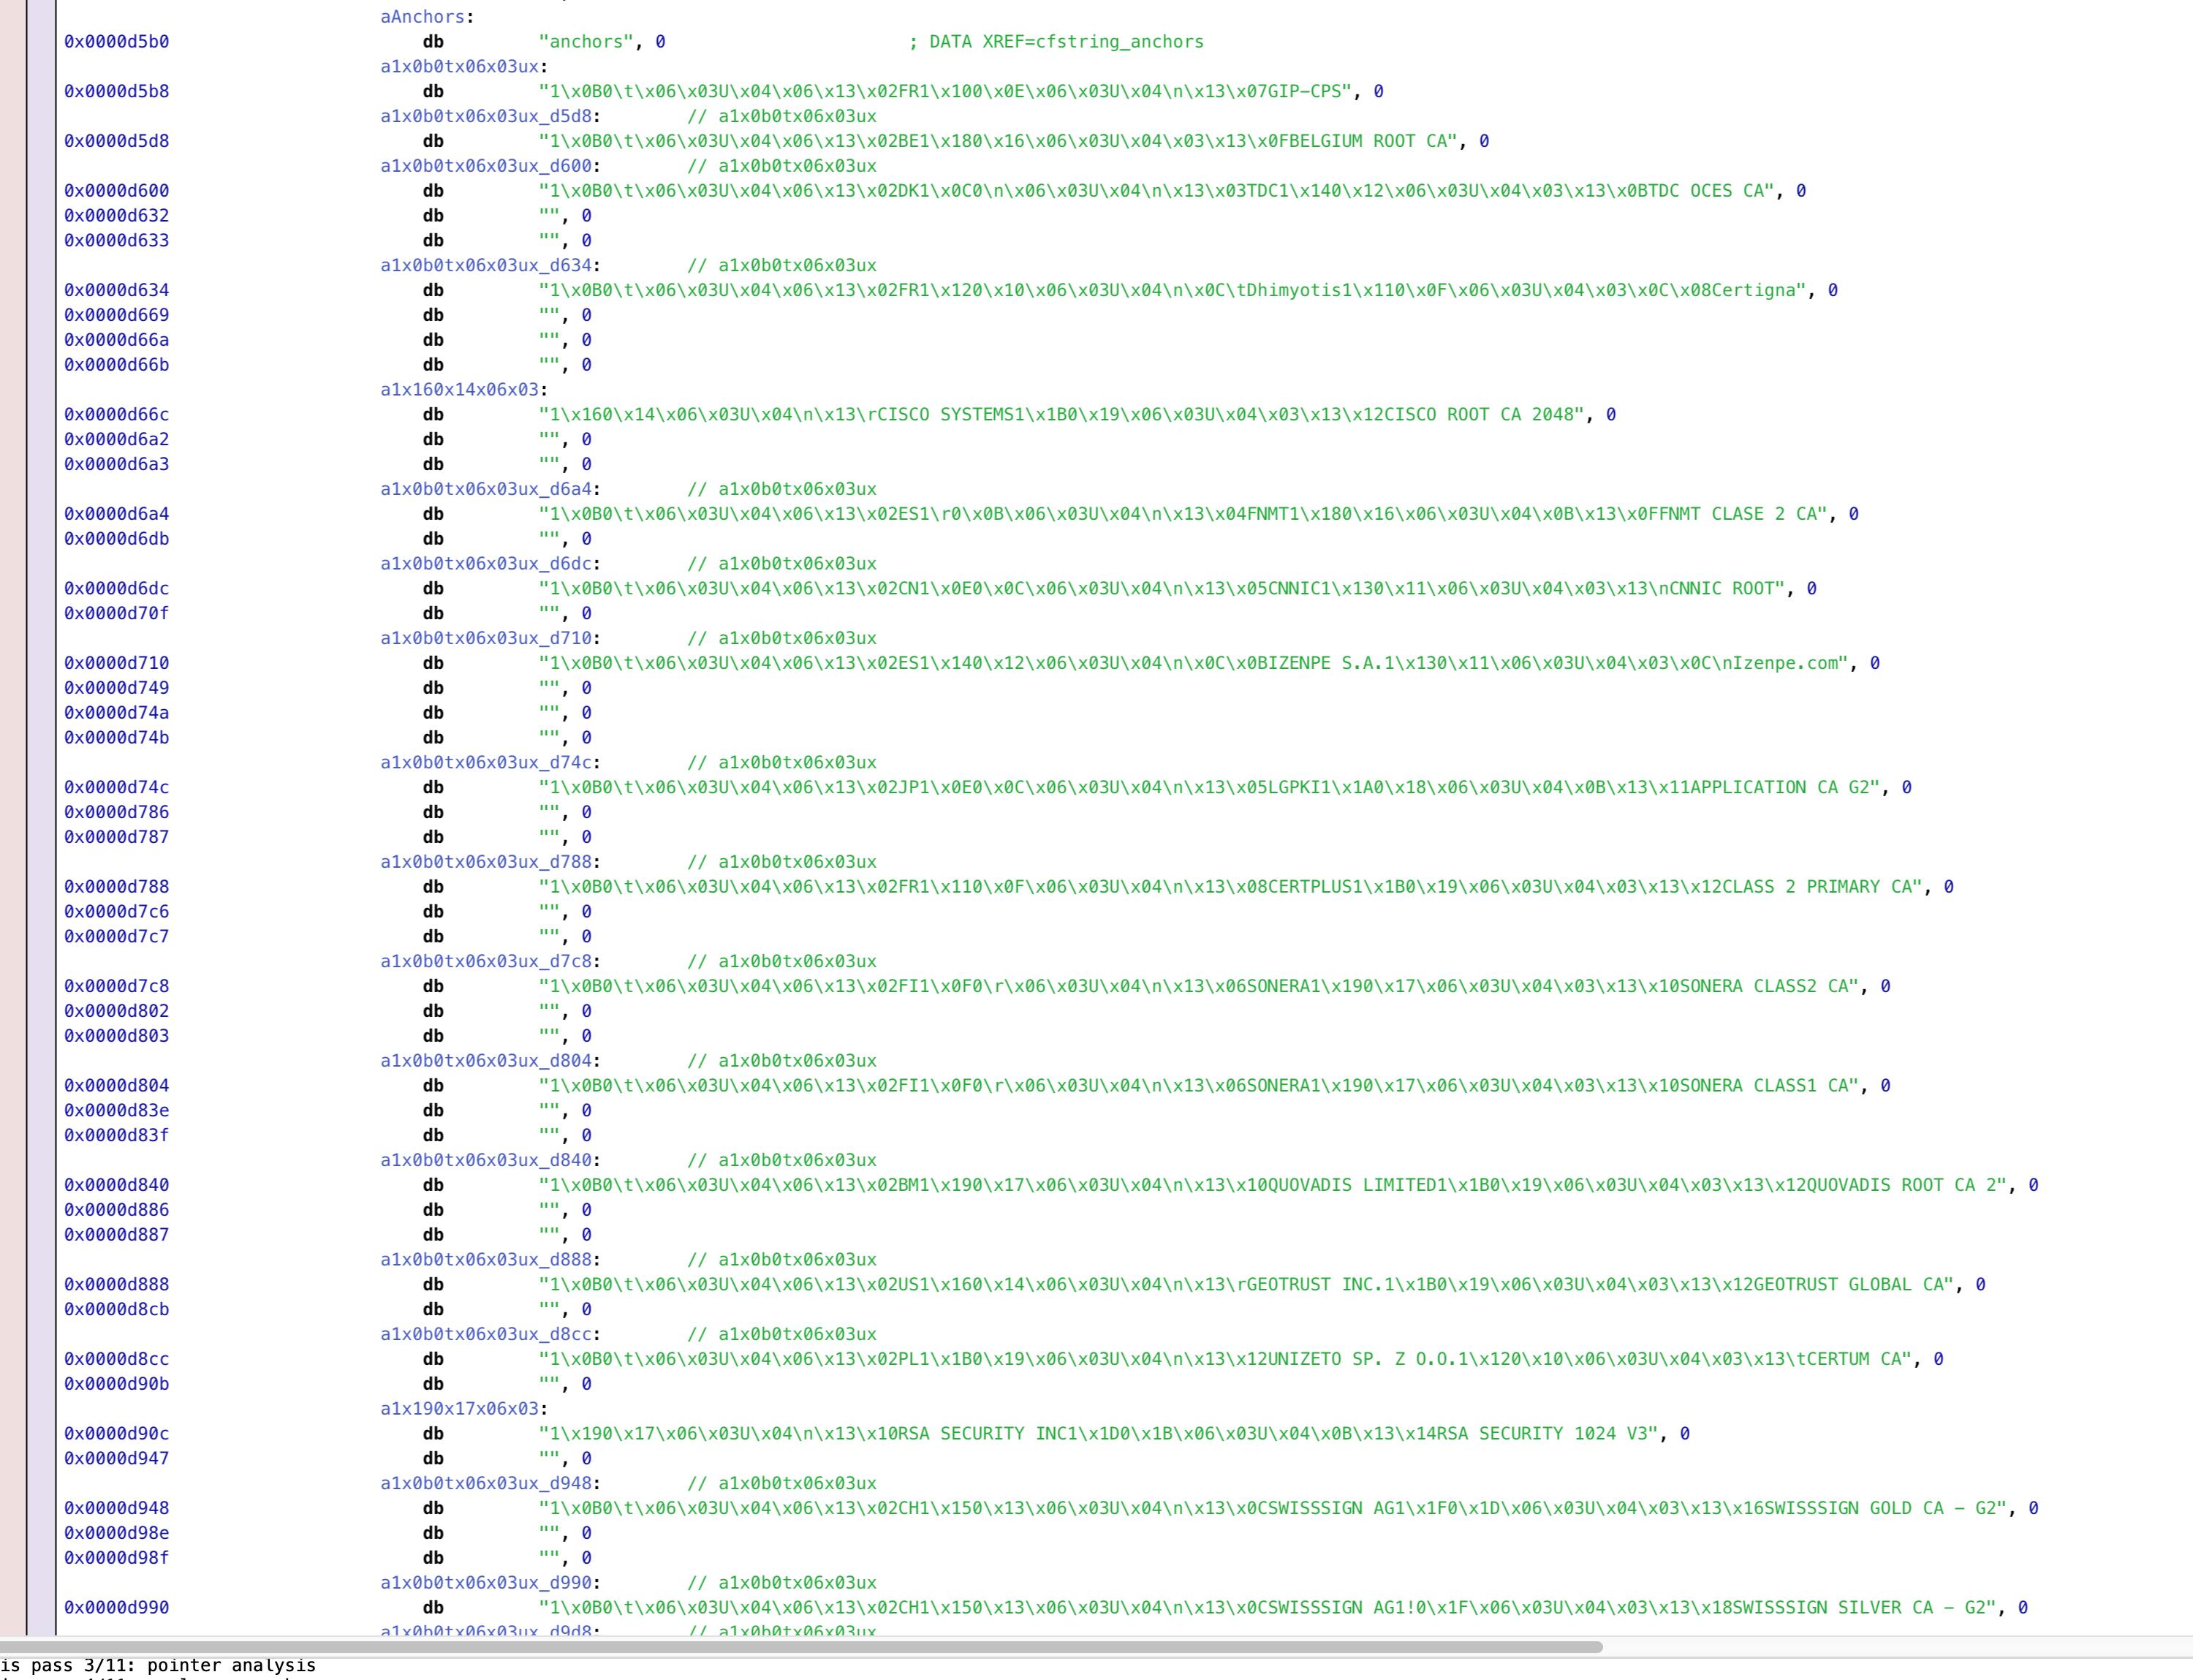
We could try to embed the R3 certificate here, but we don’t have unlimited space in the binary; we’d have to overwrite a different certificate.
Trusting a new root
Thankfully, iOS also allows the user to manually trust new root certificates. I set things up such that gala will provide the certificate on the device at /private/var/gala/GlobalSign_Root_R3.crt.
iPhone3_1_4_0_8A293_patches/root_filesystem.py
    # Provide the GlobalSign Root G3 certificate, which the user will
    # need to install to be able to connect to Cydia servers
    provide_globalsign_root_r3_cert = DmgReplaceFileContentsPatch(
        file_path=Path("private/var/gala/GlobalSign_Root_R3.crt"),
        new_content=(ASSETS_ROOT / "GlobalSign_Root_R3.crt").read_bytes(),
    )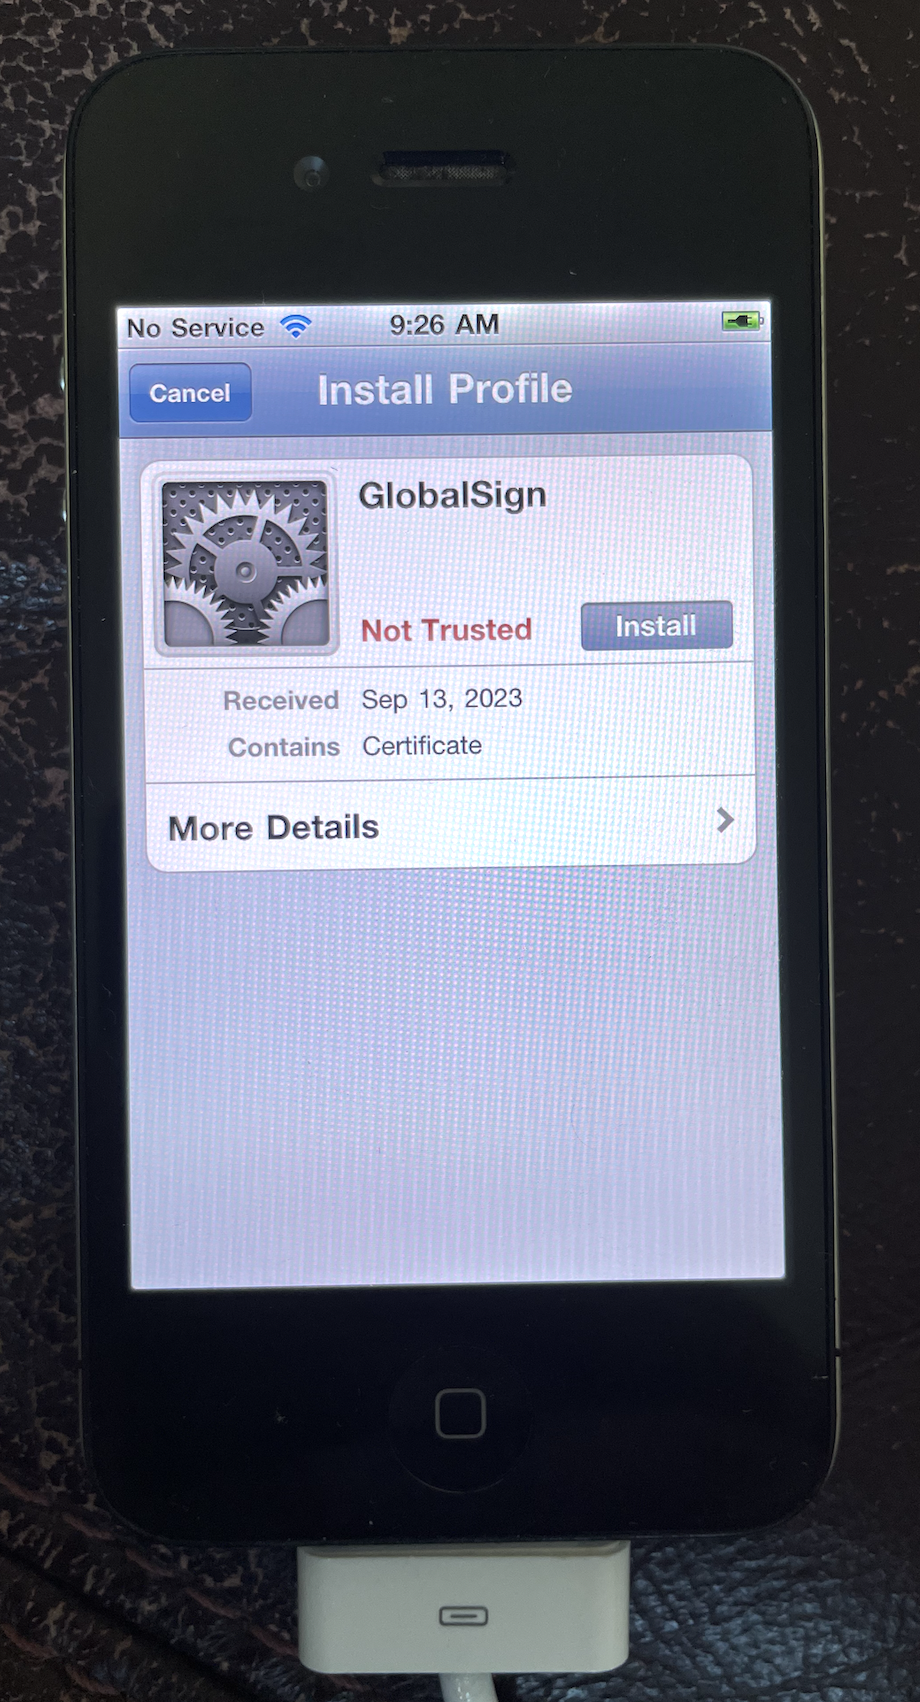
When the user installs this, a couple new entries pop up in /private/var/Keychains/keychain-2.db and /private/var/Keychains/TrustStore.sqlite3. When a certificate chain shows up on the wire, the system will first check against the roots that have been hard-coded into securityd, then against any roots that have been manually trusted and persisted to these databases. If no matches are found, the chain is rejected.
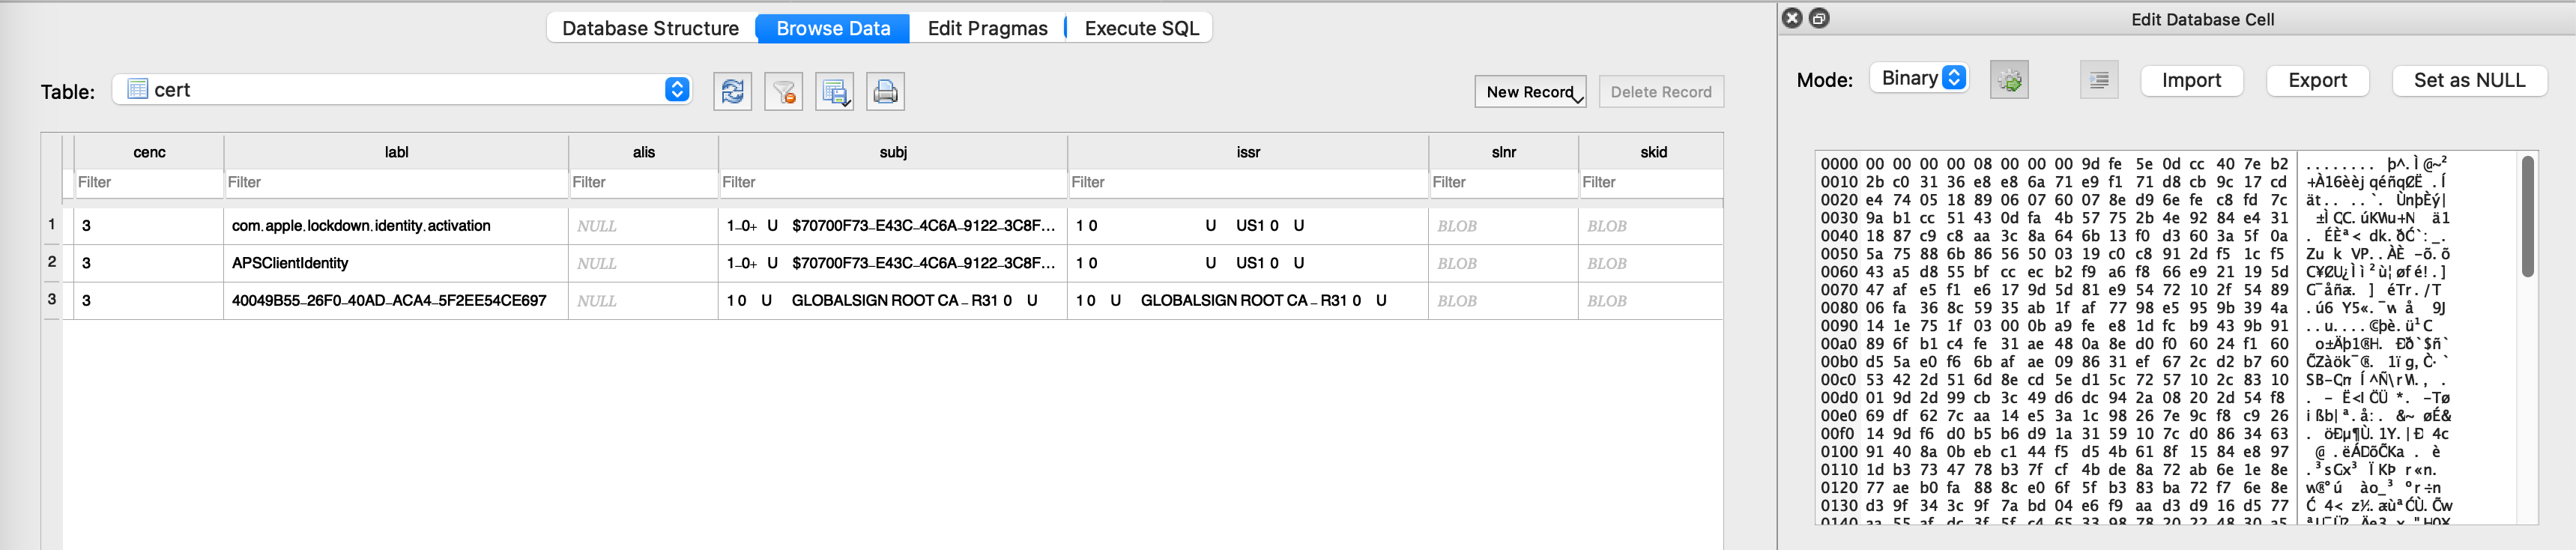
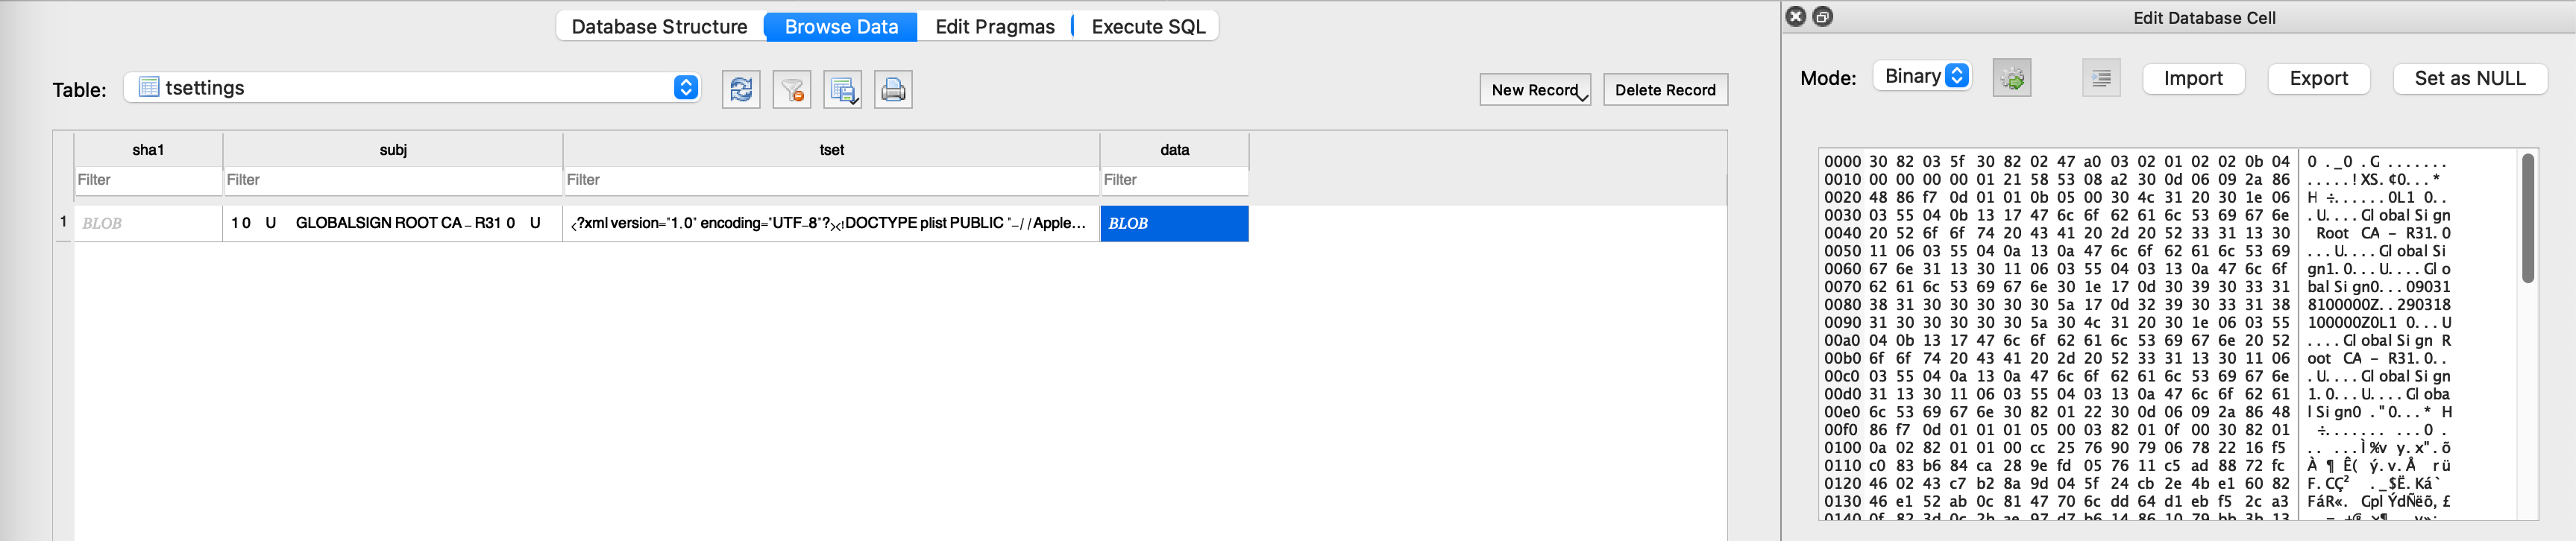
Aha! We can manually trust the certificate via the UI, then copy /private/var/Keychains/TrustStore.sqlite3 from the device, and ship it as one of gala’s assets. Then, when producing our modified iOS filesystem during the jailbreak, we can include this database in what gets flashed to the device✱! That way, all the users of the jailbreak will automatically have this certificate trusted when the jailbreak completes.
✱ Note
Code injection with MobileSubstrate
To generate the databases that trust the R3 certificate, I had to:
- Include the certificate in the filesystem.
- Browse to
/private/var/gala/GlobalSign_Root_R3.crtinMobileSafari, which prompts iOS to present a certificate trust UI. - Trust the certificate in the presented UI.
- Copy the databases from the device.
Step #2 presented an immediate challenge, because MobileSafari typically doesn’t allow the user to browse to paths on the filesystem.
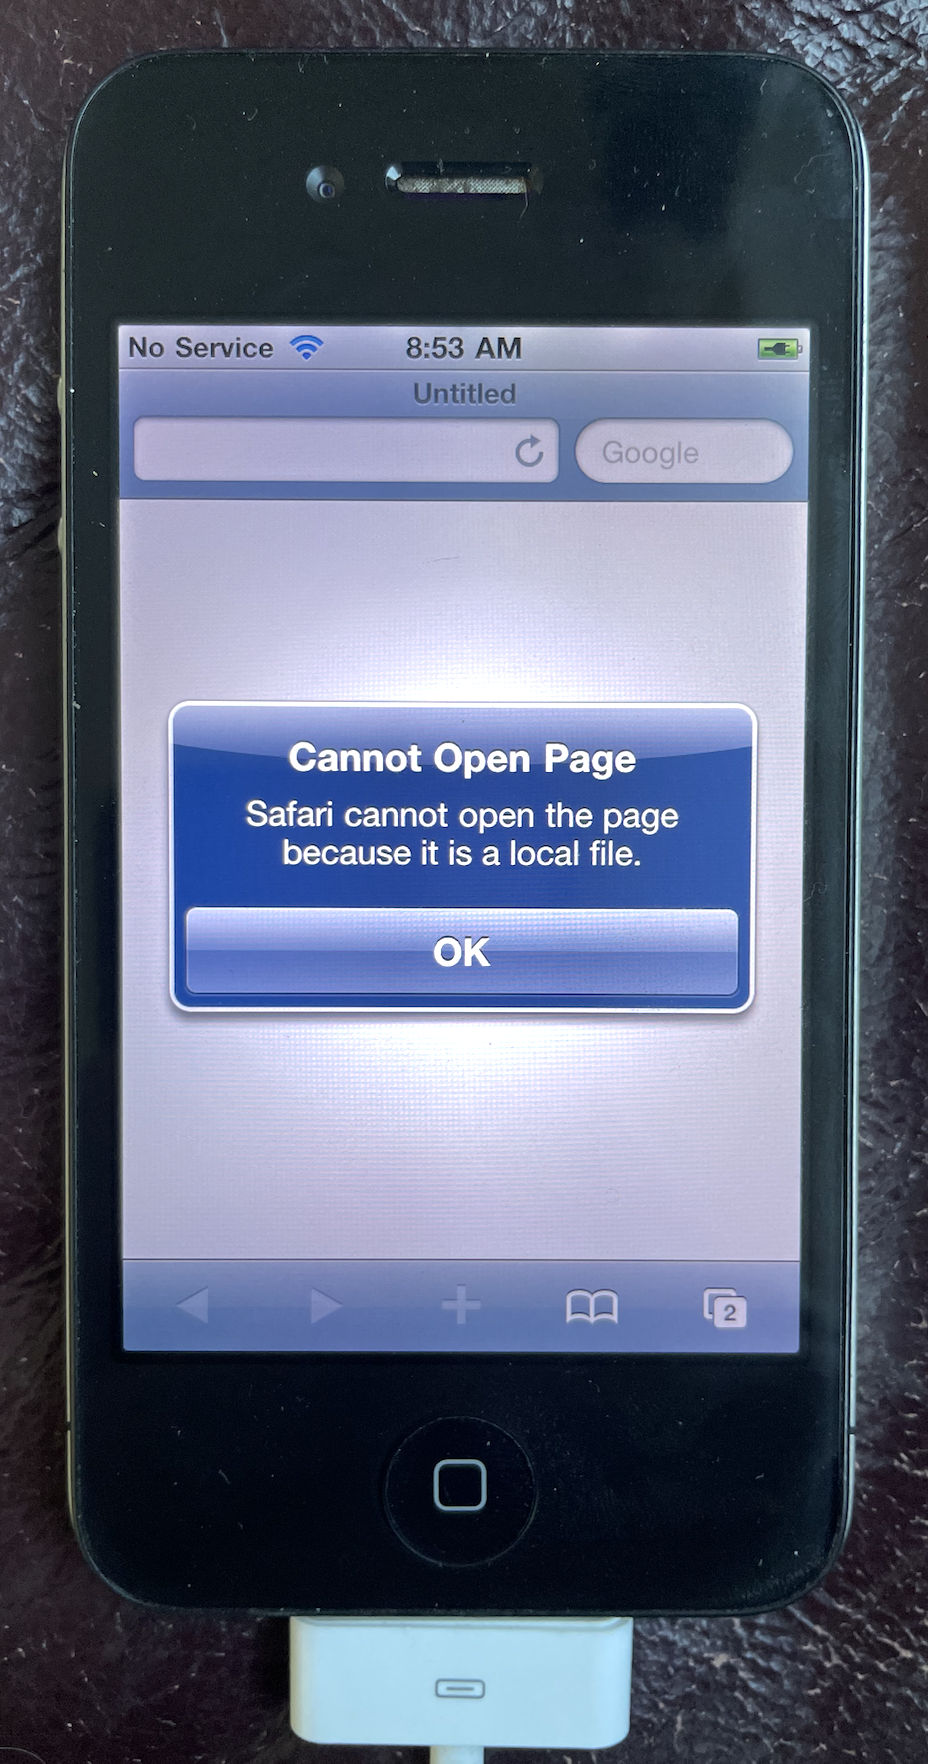
Default system got you down? Jailbreaking to the rescue! While I could have just patched this behavior out of MobileSafari, there’s another approach that provides a motivating example.
saurik made a handy tweak to nudge MobileSafari into allowing the user to browse to local files, aptly named file:// for MobileSafari. Like most jailbreak tweaks, it relies on MobileSubstrate to perform code injection at runtime, rather than patching a binary wholesale prior to boot.
MobileSubstrate is a core part of what end-users expect out of a jailbreak, and we’ll need to make sure that it works well on devices jailbroken with gala. One of its core components is cynject, which wraps up the job of injecting a .dylib into a PID.
I installed MobileSubstrate from saurik’s repo that comes preinstalled with this Cydia build. When we launch cynject, though, it crashes!
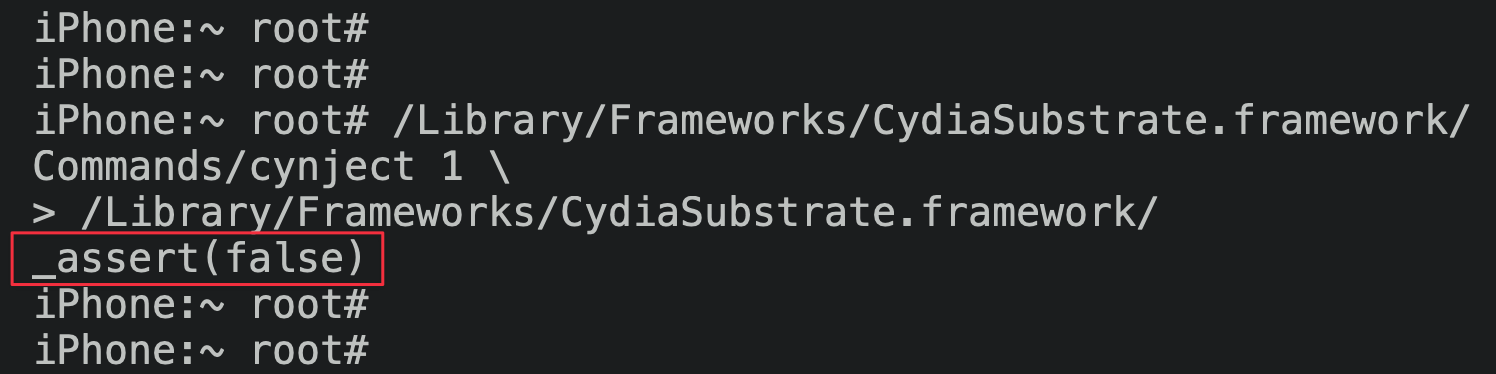
The error messages that cynject provides are entirely opaque, and weren’t useful for tracking down the source of the problem. cynject is closed source, so I had to resort to the same methods that I used on iOS itself: injecting shellcode to dump register state and patching around failures.
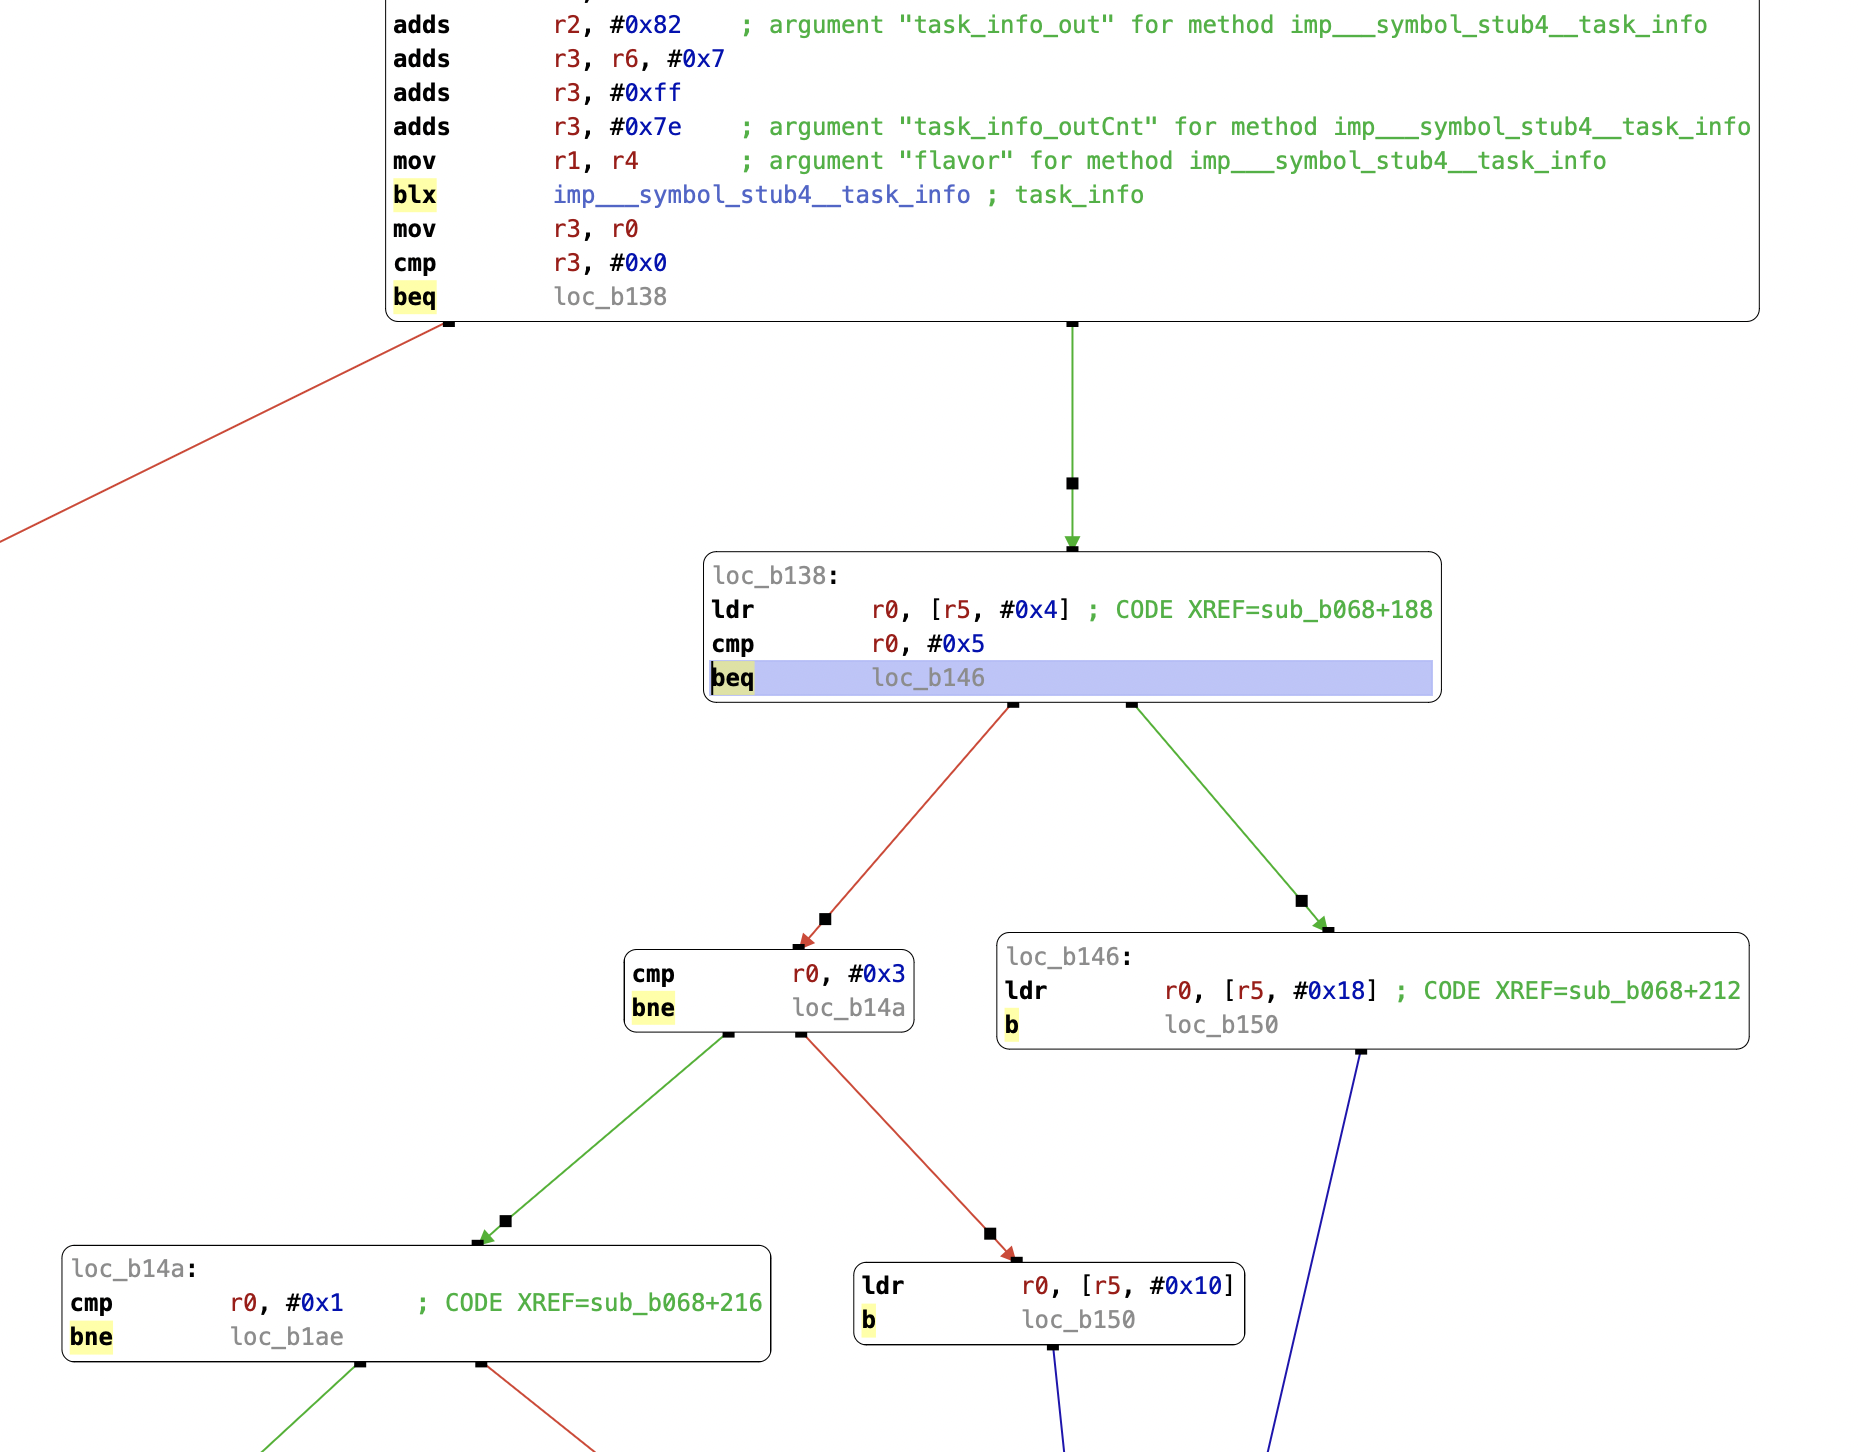
In the end, I had to patch three failing conditions to get cynject to stop crashing. I had no idea what cynject thought was wrong, but everything seems to work!
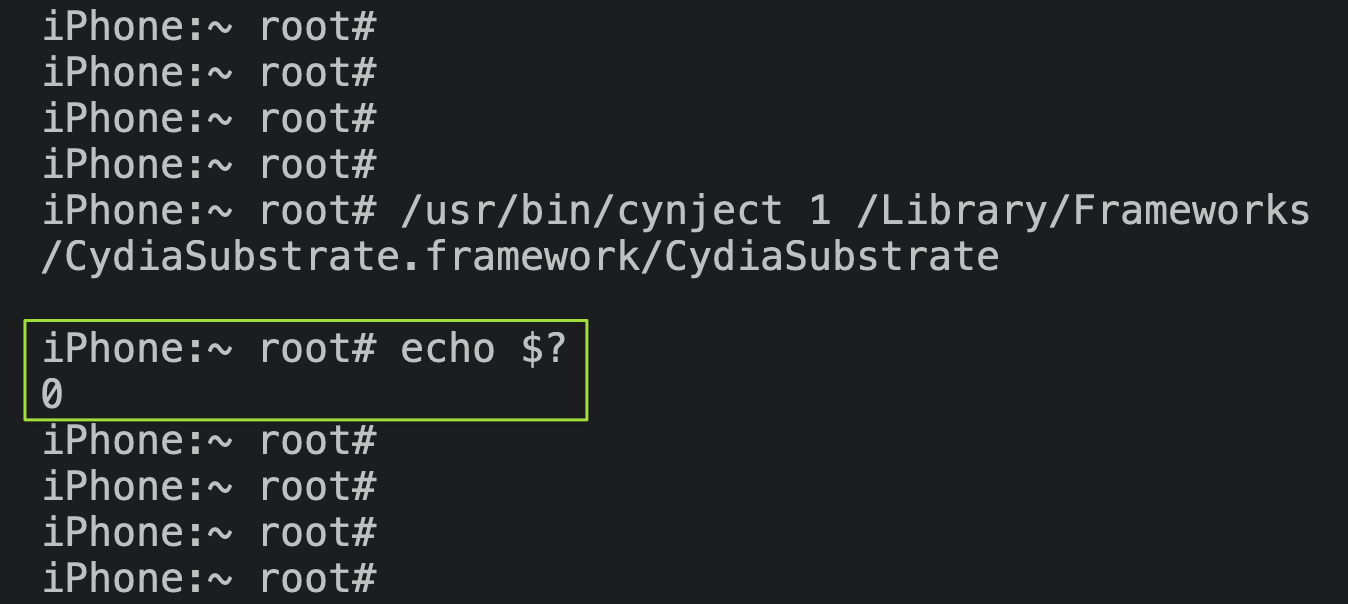
I ended up reaching out to saurik about this, and he helpfully dug into the code on his end. It turns out that my patch above is pushing cynject onto a code path that expects a data shape just close enough to what this kernel actually returns for things to work. Newer MobileSubstrate builds (0.9.7000 and above) resolve this issue. MobileSubstrate updates are no longer pushed to the repo that comes preinstalled with this Cydia build, so gala users will need to add a repo that hosts a newer build (such as http://apt.saurik.com/beta/substrate11/).
With a newer MobileSubstrate build, cynject chugs along happily.
I then was able to use file:// for MobileSafari to browse to the R3 certificate, trust it, and retain the generated databases. Great!
Now that the system is willing to give the time of day to chains that mention the R3 certificate, Cydia will successfully render its homepage.
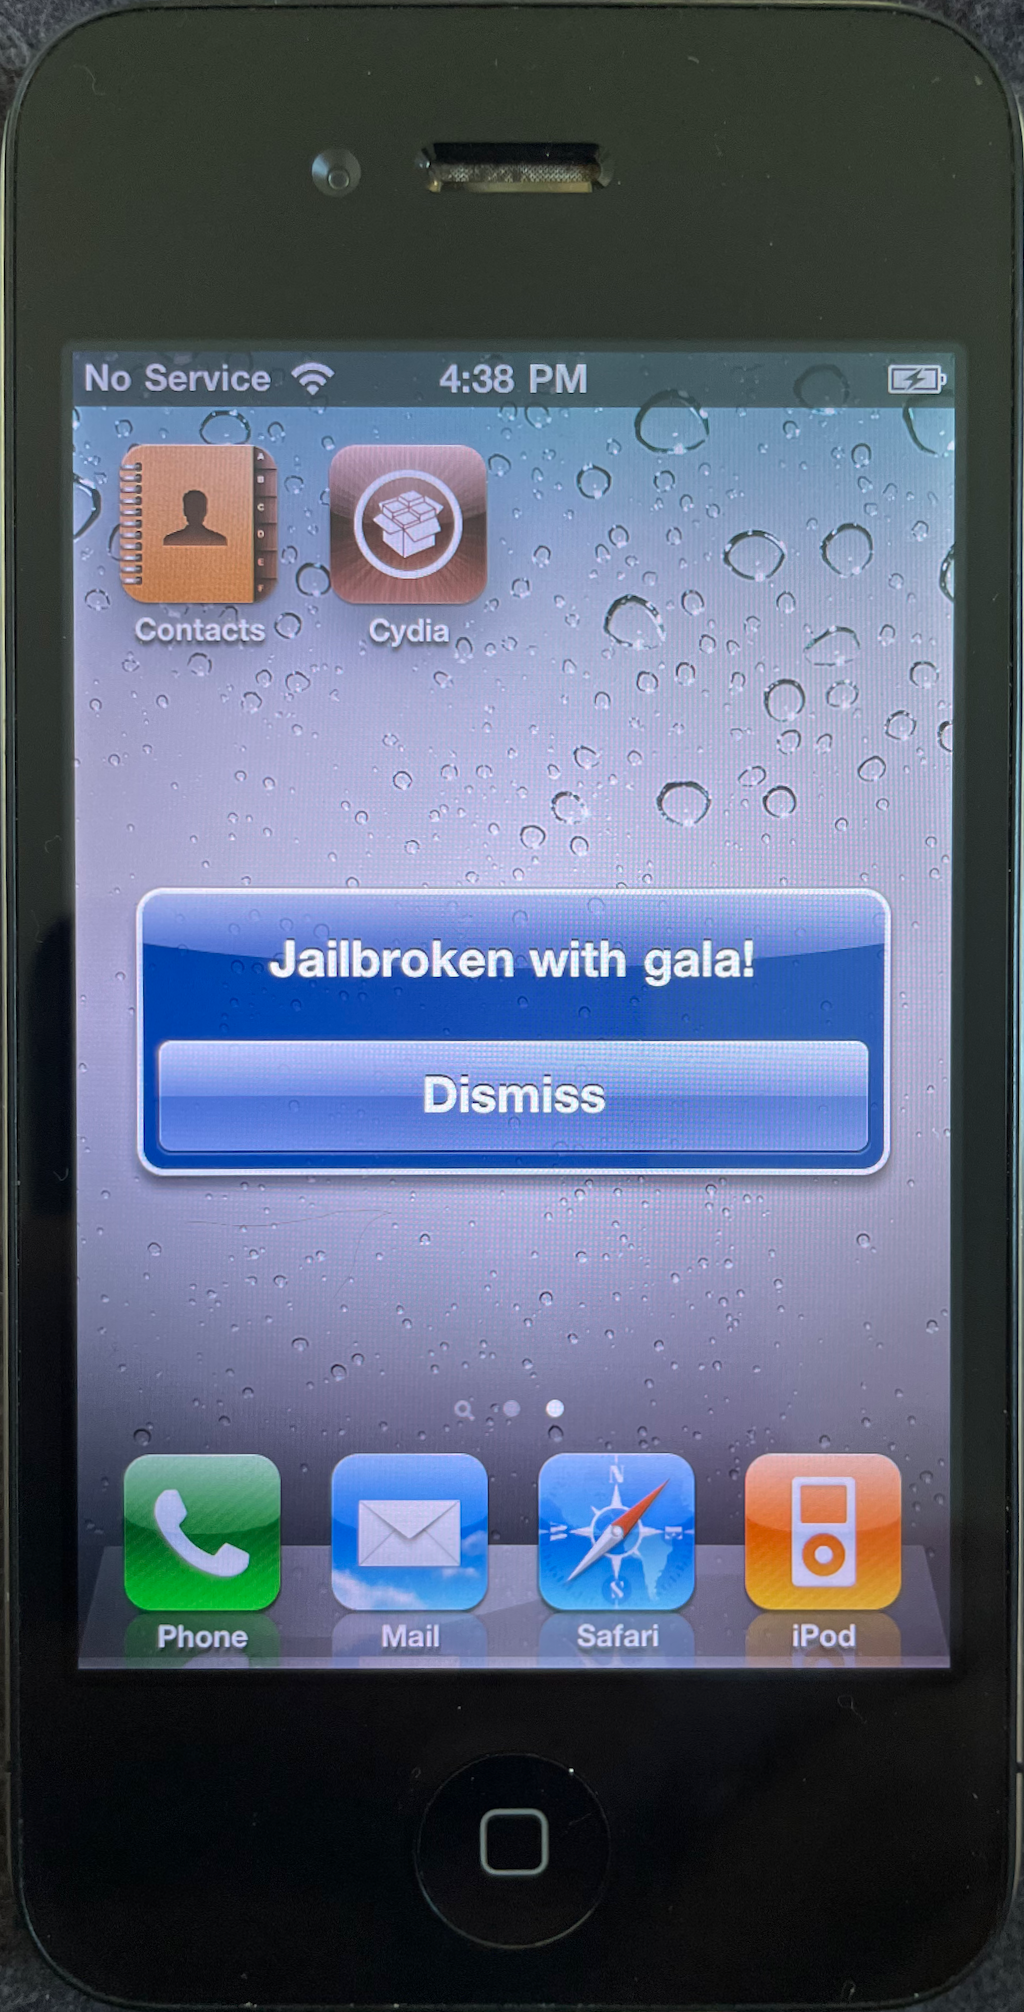
Now we can go ahead and use Cydia to install Mobile Substrate, and anything else we like!
Here’s one last video of the whole shebang, from start to finish: first gala jailbreaks the device, then gala performs a tethered boot. The full procedure takes around 8 minutes.
End of an era
gala’s code, and instructions for use, can be found here.
With that, we’re officially done! We started by writing an implementation of a SecureROM exploit, and used it to learn about and compromise the entire system from the ground up, slowly coaxing iOS into booting. We also provided several features in userspace that enable the typical jailbreaking experience for users. This was a really fun and satisfying journey to build. Thanks for following along!