Writing about writing about programming
Reading time: 19 minutes
When I’m being first-order productive, I’m programming: creating and interacting with a system.
This first-order productivity is great, but it isn’t discoverable for others: there’s generally a high bar to entry for comprehending another person’s work when it’s expressed solely as a structured program.
Second-order productivity is when I’m writing about programming, or about systems. This kind of productivity is generally more accessible and distributable, and forms most of the content of this blog!
Third-order productivity involves writing software to help me produce the writing about programming.
And that brings us, today, to fourth-order productivity: writing about a system I’ve made to help me write about systems I’ve made.
Creating unnecessary tooling
Last week, I was writing some as-yet-unpublished technical content, with the twist that the reader should be able to follow along and run the program with me as it’s being described.
The result I envisioned was going to include lots of interspersed prose and code! I needed some way to keep the content organized. And not just that: programming is so often about the feedback loop between making a small change, observing the result, and building a bit more. I wanted this to be reflected in the reader’s experience.
At many checkpoints throughout the post, the user should be able to compile the code they’ve seen so far without errors. They should be able to run the program, and see something that lines up with where we are in the explanation. All of this should be automatically enforced: I shouldn’t be able to introduce an error by forgetting to carry forward an edit to future code snippets.
What I’m describing above will more or less be an implementation of literate programming, though my understanding is that literate programming doesn’t have the ‘checkpoints’ concept I’m after. One user of literate programming gives their testimony:
I used Literate Programming for a project once. It was really hard, and the results were really good. Seemed like a reasonable tradeoff.
Obviously, we’ll need to implement a bespoke literate programming scheme from scratch.
penpal
penpal is the tool I’ve written to facilitate these tasks:
- Define a syntax for intermixing prose and code.
- Progressively expand the program, and add code to the source tree as it becomes relevant to the prose.
- Produce markup suitable for embedding in this blog.
- Produce source trees at each checkpoint, ensuring the code is compilable and the user can follow along.
- Hot reload when the content changes to facilitate a tight feedback loop for writing content.
Rather than take you through a tour of the implementation of my new literate programming scheme by using my literate programming scheme (which would be just a tad too meta for my sensibilities), I’ll instead use this post to demonstrate penpal’s usage by implementing something small and straightforward: a Rust-based 2048 clone.
A Rust-based 2048 clone?!
I wrote out that sentence, so now I’m committed. Let’s get started! I won’t spend too long on the specifics of the Rust implementation, since the main point here is the preprocessing tooling. I’ll stick to a stdin/out-based interface for now, rather than setting up all the plumbing that a pixel-driven interface would entail.
$ cargo new game
Created binary (application) `game` package
The above is a bog-standard code block, and we’ve no need for dynamicism yet. It’s represented as simple markdown:
blog/penpal/index.md
```text
$ cargo new game
     Created binary (application) `game` package
```
Runloop with room to grow
Programs are generally structured as a series of types, operations, and a core runloop that drives work. When building a program I’ll normally start off by sketching a runloop that doesn’t do much, then continue by defining the types and data model.
Our runloop has a pretty straightforward design. We’ll wait for some input, apply it to the game state, and print out the new state. Let’s start by adding an entry point.
src/main.rs
0use std::io;
1
2fn main() -> io::Result<()> {
3    println!("Game started!");
4
5    Ok(())
6}
Now this is interesting! We’ve defined a file, src/main.rs, that contains some boilerplate. Unlike the shell command up above, though, this code isn’t going to remain static. It’s going to grow over time, and it’ll eventually need to include imports, game setup, and our runloop. In this blog’s source code for the snippet above, I’ve referenced other snippets that can be progressively filled in. We’ll add in each piece of code to the source tree as it becomes relevant to the implementation.
Here’s what the snippet above looks like in the markup backing this blog post, which is provided as input to penpal and later rendered to HTML.
blog/penpal/index.md
{{define main_rs
file: src/main.rs
lang: rust
###
use std::io;
{{dependency_imports}}
{{module_imports}}
{{module_declarations}}

fn main() -> io::Result<()> {
    println!("Game started!");
{{set_up_board}}
{{main_runloop}}

    Ok(())
}
}}
{{show main_rs}}
We define a snippet called main_rs, with a given source language and file path. In it, we embed a few other snippets which are yet to be defined:
dependency_importsmodule_importsmodule_declarationsset_up_boardmain_runloop
We then show the main_rs snippet so its current state renders in the blog. This works even though the other snippets haven’t been defined yet, because it’s convenient to do so. Otherwise, I get bogged down defining things that aren’t going to be used for a while!
Let’s generate an executable representing our (tiny!) source tree so far.
blog/penpal/index.md
{{generate}}
Press the power button to start
Next, let’s define the game board and the cells it contains. We’ll introduce a new module, board.rs, so let’s fill in the module_declarations snippet we mentioned earlier.
First, let’s see the markup provided to penpal in the source code of this blog:
blog/penpal/index.md
{{define module_declarations
lang: rust
###

mod board;
}}
{{show module_declarations}}
And now, the rendered result:
src/main.rs
0use std::io;
1mod board;
2
3fn main() -> io::Result<()> {
4    println!("Game started!");
Hey, that’s cool! We defined module_declarations, and penpal was smart enough to remember that it was used earlier in the top-level main_rs snippet. penpal then showed the newly defined snippet in-context with the surrounding code, and highlighted it for clarity.
I’ll keep the meta-commentary to a minimum from here on out, and focus on soaking up the sights of gradually composing a program in markup.
Each Cell stores its own cartesian coordinates, and will either store a value or be Empty.
src/board.rs
 0pub(crate) const BOARD_WIDTH: usize = 4;
 1pub(crate) const BOARD_HEIGHT: usize = 4;
 2
 3#[derive(Debug, PartialEq, Copy, Clone)]
 4pub struct BoardCoordinate(usize, usize);
 5
 6#[derive(Debug, PartialEq, Copy, Clone)]
 7pub enum CellContents {
 8    Empty,
 9    Occupied(usize),
10}
11
12#[derive(Debug, PartialEq, Clone)]
13pub struct Cell {
14    coords: BoardCoordinate,
15    pub(crate) contents: CellContents,
16}
17
18impl Cell {
19    fn with_coords(coords: BoardCoordinate) -> Self {
20        Self {
21            coords,
22            contents: CellContents::Empty,
23        }
24    }
25}
26}
The Board is backed by a flat list of Cells.
src/board.rs
25    }
26}
27
28#[derive(Debug)]
29pub(crate) struct Board {
30    pub(crate) cells: [Cell; BOARD_WIDTH * BOARD_HEIGHT],
31}
32
33impl Board {
34    pub(crate) fn new() -> Self {
35        let mut cells = vec![];
36        for row_idx in 0..BOARD_HEIGHT {
37            for col_idx in 0..BOARD_WIDTH {
38                cells.push(Cell::with_coords(BoardCoordinate(col_idx, row_idx)));
39            }
40        }
41        Self {
42            cells: cells.try_into().unwrap()
43        }
44    }
45}
Let’s set up an initial Board to mess around with.
src/main.rs
0use std::io;
1use crate::board::Board;
2mod board;
3
4fn main() -> io::Result<()> {
src/main.rs
 4fn main() -> io::Result<()> {
 5    println!("Game started!");
 6    let board = Board::new();
 7    println!("{board:?}");
 8
 9    Ok(())
10}
Press the power button to start
This Board is going to be a bit tough to visualize without some more work. Rendering it nicely will go a long way. Let’s add some utilities for pretty-printing a Board and its Cells.
src/board.rs
10    Occupied(usize),
11}
12
13impl CellContents {
14
15    fn as_padded_str(&self) -> String {
16        match &self {
17            Self::Empty => "    ".to_string(),
18            Self::Occupied(value) => format!("{: ^4}", value),
19        }
20    }
21
22}
23
24#[derive(Debug, PartialEq, Clone)]
25pub struct Cell {
We’ll need to use some String formatting machinery from the standard library, so let’s go ahead and import that now.
src/board.rs
0use std::fmt::{Display, Formatter};
1
2pub(crate) const BOARD_WIDTH: usize = 4;
3pub(crate) const BOARD_HEIGHT: usize = 4;
Even though the Board stores its Cells as a flat list, it can be quite convenient to interact with the cells as though they’re stored in a series of rows, or in a series of columns. For example, when ‘pressing’ the board to one direction, we’ll want to group the cells along the direction’s axis.
To facilitate this, we’ll introduce a couple utility methods that give us the cell indexes grouped by rows, or grouped by columns. The users of these functions, like the Display implementation we’re after, can then iterate over the indexes in whichever grouping is convenient.
src/board.rs
55        }
56    }
57
58    fn cell_indexes_by_row(&self) -> Vec<Vec<usize>> {
59        (0..BOARD_WIDTH).map(|col_idx| {
60            (0..BOARD_HEIGHT).map(|row_idx| {
61                (row_idx + (col_idx * BOARD_WIDTH))
62            }).collect::<Vec<_>>()
63        }).collect::<Vec<_>>()
64    }
65
66    fn cell_indexes_by_col(&self) -> Vec<Vec<usize>> {
67        (0..BOARD_HEIGHT).map(|row_idx| {
68            (0..BOARD_WIDTH).map(|col_idx| {
69                (row_idx + (col_idx * BOARD_WIDTH))
70            }).collect::<Vec<_>>()
71        }).collect::<Vec<_>>()
72    }
73}
We’re now ready to provide the impl Display for Board!
src/board.rs
 72    }
 73}
 74
 75impl Display for Board {
 76    fn fmt(&self, f: &mut Formatter<'_>) -> std::fmt::Result {
 77        // Let's just handle a maximum cell contents width of 4 characters, plus 3 spaces on either side for padding
 78        // This will cause the presentation to go a bit wonky once the player hits the 16,384 tile, but I think
 79        // they can handle it =)
 80        let cell_width = 4 + 3 + 3;
 81        let cell_width_including_inter_cell_border = cell_width + 1;
 82
 83        let horizontal_trim = "-".repeat(cell_width_including_inter_cell_border * BOARD_WIDTH);
 84        write!(f, "\n{}-\n", horizontal_trim)?;
 85
 86        for cell_indexes_in_row in self.cell_indexes_by_row().iter() {
 87            // Each tile should occupy a few lines vertically, to bulk out the presentation
 88            for line_idx in 0..4 {
 89                let empty_cell_line = format!("|{}", " ".repeat(cell_width));
 90                match line_idx {
 91                    1 => {
 92                        for cell_idx in cell_indexes_in_row.iter() {
 93                            let cell = &self.cells[*cell_idx];
 94                            let cell_text = cell.contents.as_padded_str();
 95                            write!(f, "|   {cell_text}   ")?;
 96                        }
 97                        write!(f, "|\n")?
 98                    }
 99                    3 => write!(f, "{}-\n", horizontal_trim)?,
100                    _ => write!(f, "{}|\n", empty_cell_line.repeat(BOARD_WIDTH))?
101                }
102            }
103        }
104
105        Ok(())
106    }
107}
And now, we’ll check out our Display implementation by removing the :? format specifier.
src/main.rs
 4fn main() -> io::Result<()> {
 5    println!("Game started!");
 6    let board = Board::new();
 7    println!("{board}");
 8
 9    Ok(())
10}
Press the power button to start
That’s looking a lot better! Let’s add a bit of temporary code to ensure the board is rendering its cells correctly.
src/main.rs
0use std::io;
1use crate::board::{Board, CellContents, BOARD_WIDTH, BOARD_HEIGHT};
2mod board;
3
4fn main() -> io::Result<()> {
src/main.rs
 4fn main() -> io::Result<()> {
 5    println!("Game started!");
 6    let mut board = Board::new();
 7    for i in 0..16 {
 8        board.cells[i].contents = CellContents::Occupied(i)
 9    }
10    println!("{board}");
11
12    Ok(())
13}
Press the power button to start
Cool! Things are looking good with our Board and Cell representations. Let’s start building out the game logic.
Implementing 2048
In 2048, the board starts out with two tiles spawned in random locations. These tiles, and any spawned later, contain a randomly chosen value of either 2 or 4. When the user swipes left, right, up, or down, the tiles snug up in that direction. If two adjacent tiles contain the same value (e.g. 16 and 16), the tiles will merge into a doubled value.
Since we’re now going to be injecting a bit of randomness, let’s add the rand crate to our Cargo.toml.
Cargo.toml
3edition = "2021"
4
5[dependencies]
6rand = "0.8.5"
Next, let’s implement a utility to select an empty cell and spawn a new value.
src/board.rs
72        }).collect::<Vec<_>>()
73    }
74
75    pub(crate) fn spawn_tile_in_random_location(&mut self) {
76        // Pick a random free cell
77        let free_cells = self.cells.iter_mut().filter(|elem|{
78            elem.is_empty()
79        });
80        let chosen_cell = free_cells.choose(&mut thread_rng()).unwrap();
81        let value = [2, 4].choose(&mut thread_rng()).unwrap();
82        chosen_cell.contents = CellContents::Occupied(*value);
83    }
84
85}
86
87impl Display for Board {
We’ll also need a convenient way to ask whether a given cell is empty.
src/board.rs
37        }
38    }
39
40    fn is_empty(&self) -> bool {
41        matches!(self.contents, CellContents::Empty)
42    }
43
44}
45
46#[derive(Debug)]
All done, let’s add it to the runloop!
Remove the use board::BOARD_WIDTH, etc; imports that we introduced earlier for testing. We just need the Board!
src/main.rs
0use std::io;
1use crate::board::Board;
2mod board;
3
4fn main() -> io::Result<()> {
And spawn a couple tiles when the game starts up:
src/main.rs
 4fn main() -> io::Result<()> {
 5    println!("Game started!");
 6    let mut board = Board::new();
 7
 8    // Spawn a couple tiles
 9    board.spawn_tile_in_random_location();
10    board.spawn_tile_in_random_location();
11
12    // Show the initial state of the board
13    println!("{board}");
14
15
16    Ok(())
17}
Press the power button to start
Responding to input
One of 2048’s core mechanics is sliding pieces around. This will serve as a core input mechanism for the user, and as a fun venue for us to watch our program grow.
We’ll keep things simple by reading input from stdin. The input from the user will control the Direction that we slide the board, so let’s also add a fallible conversion from a string of user input to a Direction.
src/input.rs
 0#[derive(Debug, Copy, Clone)]
 1pub(crate) enum Direction {
 2    Left,
 3    Right,
 4    Up,
 5    Down
 6}
 7
 8impl TryFrom<&str> for Direction {
 9    type Error = ();
10
11    fn try_from(value: &str) -> Result<Self, Self::Error> {
12        match value {
13            "h" => Ok(Direction::Left),
14            "j" => Ok(Direction::Down),
15            "k" => Ok(Direction::Up),
16            "l" => Ok(Direction::Right),
17            // Unhandled input
18            _ => Err(()),
19        }
20    }
21}
Add an import for our new module:
src/main.rs
3use input::Direction;
4mod board;
5mod input;
6
7fn main() -> io::Result<()> {
8    println!("Game started!");
And lastly, we’ll hook up input handling to our runloop. We’ll get the next line of input from the user, see if it’s something valid that we can interpret as a Direction, and print out what we’ve got.
src/main.rs
15    // Show the initial state of the board
16    println!("{board}");
17
18    let stdin = io::stdin();
19    for maybe_next_line_of_input in stdin.lock().lines() {
20        if let Err(e) = maybe_next_line_of_input {
21            return Err(e);
22        }
23
24        let next_line_of_input = maybe_next_line_of_input.unwrap();
25        let direction = match Direction::try_from(next_line_of_input.as_ref()) {
26            Ok(d) => d,
27            Err(_) => {
28                println!("Unrecognized input!");
29                continue;
30            },
31        };
32        println!("Processing {direction:?}");
33    }
34
35    Ok(())
36}➤ Tip: You can scroll the PC display. The web version supports arrow keys, and doesn’t require enter.
Press the power button to start
Squashing tiles
Combining tiles in 2048 brings together the carnal satisfaction of organizing a square with the unmatched thrill of counting out powers of two. First up, let’s import the Direction enum that we defined up above.
src/board.rs
0use std::fmt::{Display, Formatter};
1use rand::prelude::*;
2use crate::Direction;
3
4pub(crate) const BOARD_WIDTH: usize = 4;
5pub(crate) const BOARD_HEIGHT: usize = 4;
Next, we’ll implement the main logic for pushing tiles around.
First up, let’s define an operation for ‘moving’ a tile from one cell into another, emptying the source cell in the process. This way, we won’t accidentally forget to clear a Cell after moving its value elsewhere.
src/board.rs
62        }
63    }
64
65    fn move_cell_into_cell(&mut self, source_cell_idx: usize, dest_cell_idx: usize) {
66        self.cells[dest_cell_idx].contents = self.cells[source_cell_idx].contents;
67        // And empty the source cell, since it's been moved
68        self.cells[source_cell_idx].contents = CellContents::Empty;
69    }
70
71
72    fn cell_indexes_by_row(&self) -> Vec<Vec<usize>> {
73        (0..BOARD_WIDTH).map(|col_idx| {
Since we want to support sliding tiles in two axes (horizontal / vertical), and in two directions (lower / upper), our code will need to be generic over the axis and direction that it works with. Otherwise, we run the risk of repeating ourselves for the sake of minor tweaks in our index access strategy, such as in this C implementation of 2048 that I wrote for axle.
src/board.rs
95 chosen_cell.contents = CellContents::Occupied(*value);
96 }
97
98 fn push_cells_to_close_empty_gaps(&mut self, direction: Direction) {
99 let cell_indexes_by_col = self.cell_indexes_by_col();
100 let cell_indexes_by_row = self.cell_indexes_by_row();
101 loop {
102 let mut did_modify_cells = false;
103 let row_iter = Self::iter_axis_in_direction(direction, &cell_indexes_by_col, &cell_indexes_by_row);
104 for (dest_row, source_row) in row_iter.tuple_windows::<(&Vec<usize>, &Vec<usize>)>() {
105}
106
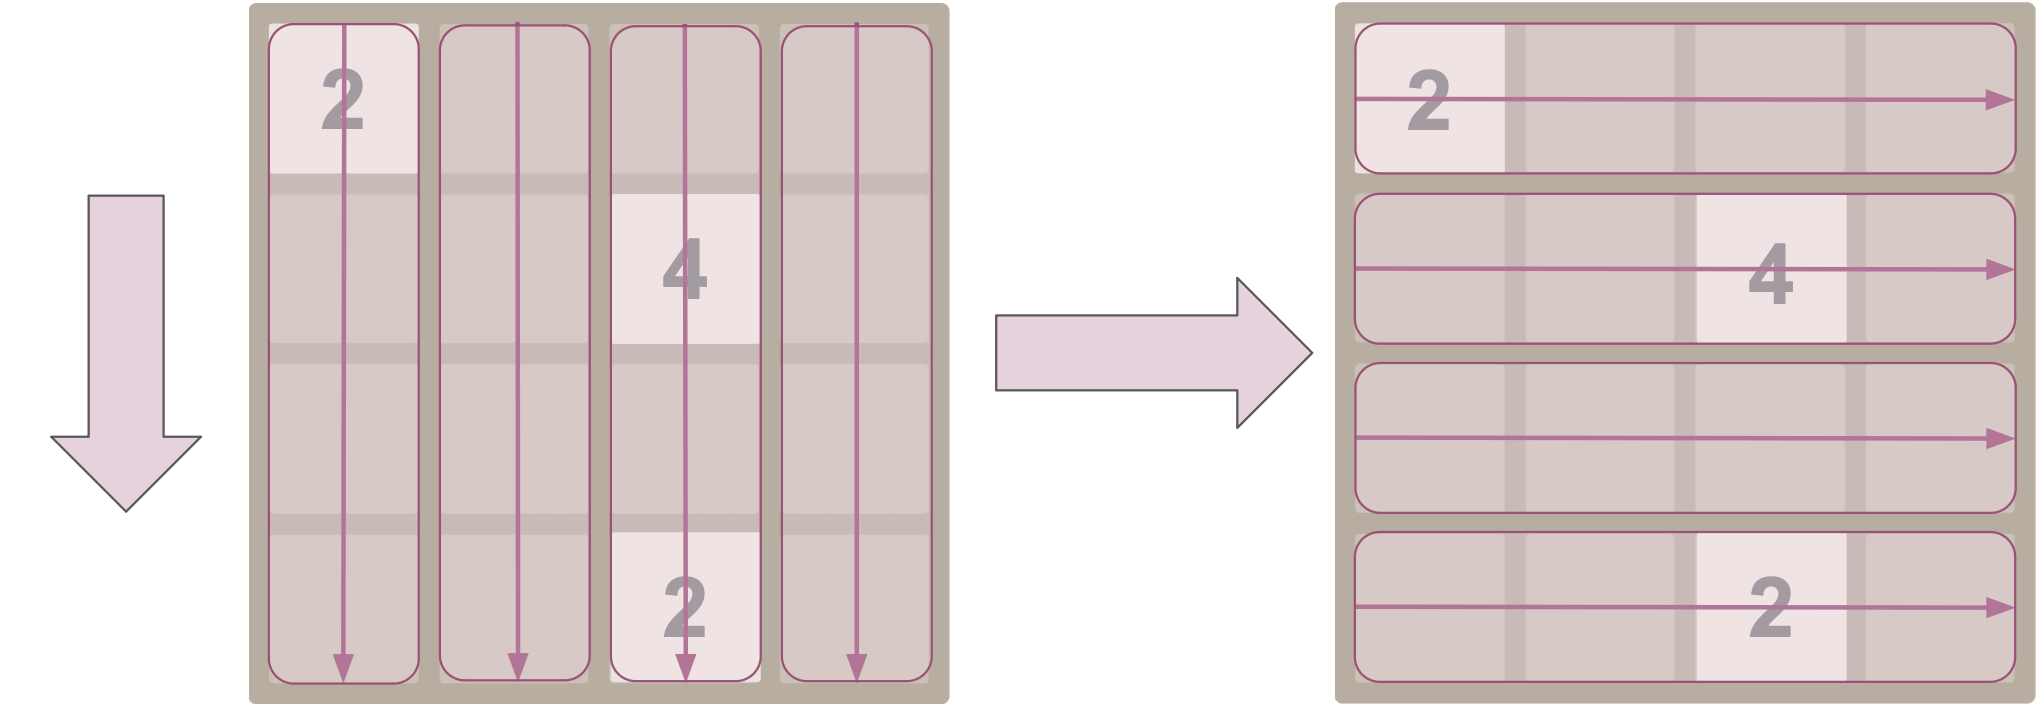
107impl Display for Board {We’re now holding a source row and dest row. The neat part is that based on the requested Direction, source and dest automatically refer to either a horizontal row (in the case of Left and Right) or a vertical column (for Up and Down), and iterate either from lower-to-upper (as with Right and Up) or upper-to-lower (Left and Down). It’s automatic! The rest of the method can just encode the business logic, and never needs to worry about the particulars of how to index and iterate correctly.
The last bit we have to do here is to actually move a tile if we see that the next space over is empty. We’ll do this process in a loop until we make it all the way through the tiles in the group without making any more changes.
src/board.rs
164            let row_iter = Self::iter_axis_in_direction(direction, &cell_indexes_by_col, &cell_indexes_by_row);
165            for (dest_row, source_row) in row_iter.tuple_windows::<(&Vec<usize>, &Vec<usize>)>() {
166                for (dest_cell_idx, source_cell_idx) in dest_row.iter().zip(source_row.iter()) {
167                    let dest_cell = &self.cells[*dest_cell_idx];
168                    let source_cell = &self.cells[*source_cell_idx];
169                    if source_cell.is_empty() {
170                        // If the source cell is empty, we have nothing to do
171                        continue;
172                    }
173                    if dest_cell.is_empty() {
174                        // If the destination cell is empty, copy the source cell
175                        self.move_cell_into_cell(*source_cell_idx, *dest_cell_idx);
176                        did_modify_cells = true;
177                        break;
178                    }
179                }
180            }
181            if !did_modify_cells {
182                break;
183            }
184        }
185    }
Let’s define the operation that we used above to iterate the cells in the correct groupings based on the given Direction.
src/board.rs
 85        }).collect::<Vec<_>>()
 86    }
 87    fn iter_axis_in_direction<'a>(
 88        direction: Direction,
 89        cell_indexes_by_col: &'a Vec<Vec<usize>>,
 90        cell_indexes_by_row: &'a Vec<Vec<usize>>
 91    ) -> Either<Iter<'a, Vec<usize>>, Rev<Iter<'a, Vec<usize>>>> {
 92        match direction {
 93            Direction::Left => Either::Left(cell_indexes_by_col.iter()),
 94            Direction::Right => Either::Right(cell_indexes_by_col.iter().rev()),
 95            Direction::Up => Either::Left(cell_indexes_by_row.iter()),
 96            Direction::Down => Either::Right(cell_indexes_by_row.iter().rev()),
 97        }
 98    }
 99
100    pub(crate) fn spawn_tile_in_random_location(&mut self) {
101        // Pick a random free cell
The return type mentions Either because the type of Iterator we need to use will be Reversed in certain directions. Let’s add itertools to our dependencies…
Cargo.toml
5[dependencies]
6rand = "0.8.5"
7itertools = "0.11.0"
… and tidy everything up by importing the types we used above.
src/board.rs
0use std::fmt::{Display, Formatter};
1use rand::prelude::*;
2use std::iter::Rev;
3use std::slice::Iter;
4
5use itertools::{Either, Itertools};
6use crate::Direction;
7
8pub(crate) const BOARD_WIDTH: usize = 4;
Now, for the ‘squash’ operation itself! For the moment, we’ll just use our logic above to slide all the tiles in the provided Direction, without merging any tiles together.
src/board.rs
185        }
186    }
187
188    pub(crate) fn press(&mut self, direction: Direction) {
189        // First, push all the elements towards the edge until they meet resistance
190        self.push_cells_to_close_empty_gaps(direction);
191    }
Lastly, let’s invoke this new press method from the runloop when we receive user input.
src/main.rs
41        };
42        println!("Processing {direction:?}");
43        board.press(direction);
44    }
Press the power button to start
Nice! One more thing, let’s add in the functionality to spawn a new tile on each turn.
src/main.rs
44        println!("Processing {direction:?}");
45        board.press(direction);
46        board.spawn_tile_in_random_location();
47        // Show the new state of the board
48        println!("{board}");
This also marks the first point at which it’s possible for the player to lose. If the board runs out of space, we should join in howls of despair alongside our bereft user, and reset the board to a clean slate.
src/main.rs
52        println!("Processing {direction:?}");
53        board.press(direction);
54        if board.is_full() {
55            println!("Game over!");
56            // Reset to an empty board
57            board.empty();
58            // And spawn an initial tile (the second will be spawned just below)
59            board.spawn_tile_in_random_location();
60        }
61
62        board.spawn_tile_in_random_location();
63        // Show the new state of the board
Checking if a board is full is straightforward: if any cell is Empty, it’s not full.
src/board.rs
194        self.push_cells_to_close_empty_gaps(direction);
195    }
196
197    pub(crate) fn is_full(&self) -> bool {
198        for cell in self.cells.iter() {
199            if cell.contents == CellContents::Empty {
200                return false;
201            }
202        }
203        true
204    }
Emptying a board is similarly small.
src/board.rs
200        true
201    }
202
203    pub(crate) fn empty(&mut self) {
204        for cell in self.cells.iter_mut() {
205            cell.contents = CellContents::Empty
206        }
207    }
Press the power button to start
Merging tiles
For the final major piece of game functionality we’ll implement, let’s handle ‘merging’ two tiles with the same value together.
First, let’s take a page from Option<T>’s book and implement unwrap() to forcibly get the contained value out of an Occupied Cell.
src/board.rs
207        }
208    }
209
210
211    fn unwrap(&self) -> usize {
212        match self {
213            Self::Empty => panic!("Expected a non-empty cell"),
214            Self::Occupied(val) => *val
215        }
216    }
217}
Next up, the main kahuna of this section: merging contiguous tiles. The general structure here is pretty similar to the logic to squash cells, but the policy is a little different. Squashing is only possible when the source cell contains a value, and the destination cell is empty. By contrast, merging is only allowed when both cells contain a value, and these values match each other.
src/board.rs
215        }
216    }
217
218    fn merge_contiguous_cells_in_direction(&mut self, direction: Direction) {
219        let cell_indexes_by_col = self.cell_indexes_by_col();
220        let cell_indexes_by_row = self.cell_indexes_by_row();
221        let row_iter = Self::iter_axis_in_direction(direction, &cell_indexes_by_col, &cell_indexes_by_row);
222        for (dest_row, source_row) in row_iter.tuple_windows::<(&Vec<usize>, &Vec<usize>)>() {
223            for (dest_cell_idx, source_cell_idx) in dest_row.iter().zip(source_row.iter()) {
224                let dest_cell = &self.cells[*dest_cell_idx];
225                let source_cell = &self.cells[*source_cell_idx];
226    pub(crate) fn press(&mut self, direction: Direction) {
227        // First, push all the elements towards the edge until they meet resistance
Everything so far is almost exactly the same as our logic in Board.press(direction: Direction)! Here’s where we really diverge.
src/board.rs
235                let dest_cell = &self.cells[*dest_cell_idx];
236                let source_cell = &self.cells[*source_cell_idx];
237                if source_cell.is_empty() || dest_cell.is_empty() {
238                    // If one of the cells is empty, we can't merge them
239                    continue;
240                }
241
242                let source_value = source_cell.contents.unwrap();
243                let dest_value = dest_cell.contents.unwrap();
244                if source_value != dest_value {
245                    // The cells didn't contain the same value, so we can't merge them
246                    continue;
247                }
248
249                // Combine into the destination cell
250                self.cells[*dest_cell_idx].contents = CellContents::Occupied(dest_value * 2);
251                // Clear the contents of the source cell, because it's been merged
252                self.cells[*source_cell_idx].contents = CellContents::Empty;
253            }
254        }
255    }
All that’s left to do now is to invoke our merging logic when handling user input.
src/board.rs
242        // First, push all the elements towards the edge until they meet resistance
243        self.push_cells_to_close_empty_gaps(direction);
244        // Now iterate again and try to merge contiguous tiles that share the same value
245        // We need to do this in a separate iteration because the behavior is subtly different:
246        // When pushing cells around, we want to recursively push cells until there's no remaining free
247        // space.
248        // However, when merging cells, we want to stop processing a row as soon as we merge a pair of cells,
249        // even if more merges are possible. The user needs to do another turn to perform the next merge.
250        self.merge_contiguous_cells_in_direction(direction);
251    }
One small piece of cleanup we’ll need to do: the act of merging cells might’ve created another gap, so we’ll ask our squasher to sort everything out once again.
src/board.rs
247        // even if more merges are possible. The user needs to do another turn to perform the next merge.
248        self.merge_contiguous_cells_in_direction(direction);
249        // The above step may have produced some gaps, so push cells again
250        // For example,
251        // | 16 | 16 | 16 |  4 |
252        // | 32 |    | 16 |  4 |
253        self.push_cells_to_close_empty_gaps(direction);
Press the power button to start
The final snapshot of the game we’ve built up can be found here, and penpal itself is open source too.
Writing about writing about writing about programming, or: The making of this blog post
The code we’ve built up together reads input from stdin and sends output to stdout, which doesn’t exist in the web’s execution environment. Since we don’t set the TTY to raw mode, there’s no way for us to capture arrow keys, and yet the demos on this page can respond to arrow-keyed input. What gives?
Fortunately for me, the galaxy-brained metaprogram templating stopped here. I manually copied the source trees that were produced at each checkpoint, added some shared scaffolding to each so that they could be compiled to Wasm, and tweaked the code in the later demos slightly so that they could accept input asynchronously from JavaScript.
On the webpage side, I then set up some JavaScript that would launch each Wasm module, and invoke all the necessary input handling callbacks. The code looks like this:
blog/penpal/interactive_demos.js
const program_name_to_dispatch = {
    "snapshot_0": [snapshot_0_init, snapshot_0_entry, null],
    "snapshot_1": [snapshot_1_init, snapshot_1_entry, null],
    "snapshot_2": [snapshot_2_init, snapshot_2_entry, null],
    "snapshot_3": [snapshot_3_init, snapshot_3_entry, null],
    "snapshot_4": [snapshot_4_init, snapshot_4_entry, null],
    "snapshot_5": [snapshot_5_init, snapshot_5_entry, snapshot_5_handle_input],
    "snapshot_6": [snapshot_6_init, snapshot_6_entry, snapshot_6_handle_input],
    "snapshot_7": [snapshot_7_init, snapshot_7_entry, snapshot_7_handle_input],
    "snapshot_8": [snapshot_8_init, snapshot_8_entry, snapshot_8_handle_input],
};

const program_containers = $('.penpal_program_container');
program_containers.each(function() {
    // ...
    const [init, entry, maybe_handle_input] = program_name_to_dispatch[program_name];

    // Start the program when the user clicks the power button
    $(this).click(function() {
        init().then(() => {
        let output = entry();
            preformatted_container.text(output);
        });
    });
});

// Pass keyboard input to the program that has mouse focus
document.onkeydown = function(e) {
    // ...
    const keycode_to_direction_and_input_repr = {
        37: ["Left", "<left arrow>"],
        72: ["Left", "h"],
        38: ["Up", "<up arrow>"],
        75: ["Up", "k"],
        39: ["Right", "<right arrow>"],
        76: ["Right", "l"],
        40: ["Down", "<down arrow>"],
        74: ["Down", "j"],
    };
    const [direction, input_repr] = keycode_to_direction_and_input_repr[e.which];
    const new_text = maybe_handle_input(direction);
    program_container.text(`${program_container.text()}\n${new_text}`);
That’s all folks!